How to Read Crochet Patterns: 4 Easy Steps for Beginners
Ever opened a crochet pattern and felt like you were reading a completely different language? With abbreviations like sc, dc, ch, rep, and sk, even a simple pattern can look confusing when you’re just getting started.
In this beginner-friendly guide, you’ll learn how to read crochet patterns step by step without trying to understand everything at once. We’ll break down abbreviations, repeats, stitch counts, rows and rounds, gauge, multiple sizes, and basic crochet charts into simple pieces you can actually follow.
By the end, you’ll be able to look at a crochet pattern, understand what each instruction is asking you to do, and work through it with much more confidence.
What Does a Crochet Pattern Tell You?
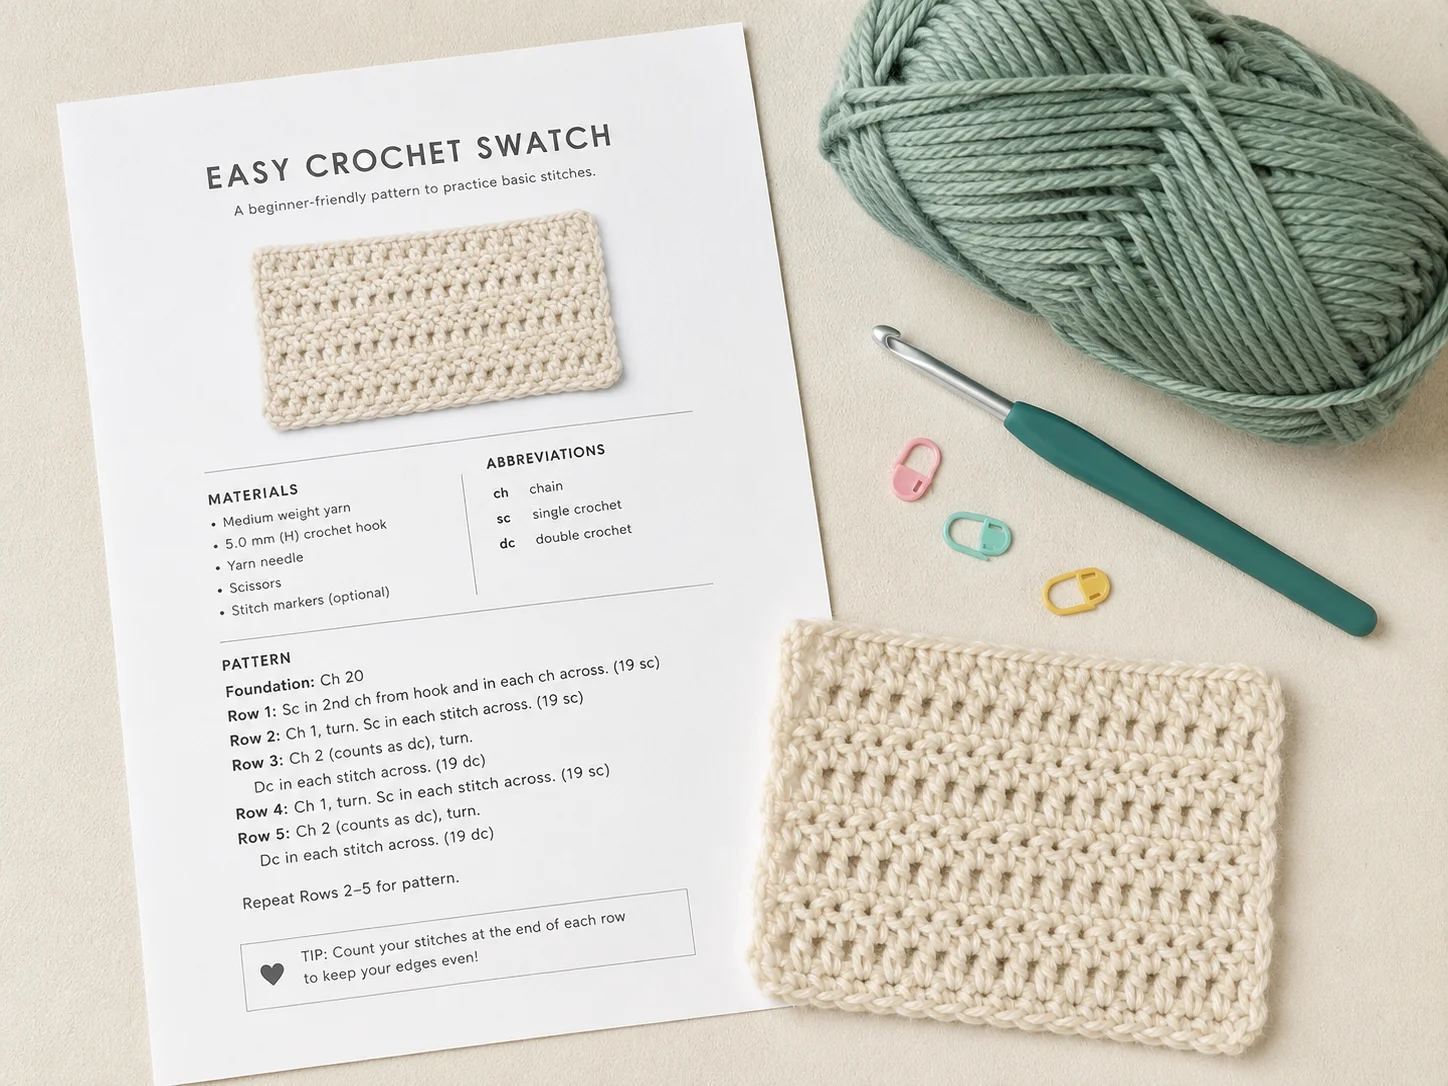
A crochet pattern is a set of written or charted instructions for making a specific project. Most patterns tell you several things before the actual crocheting begins:
- finished size or available sizes
- yarn type and amount
- crochet hook size
- gauge
- abbreviations
- special stitches
- pattern notes
- row or round instructions
- finishing instructions
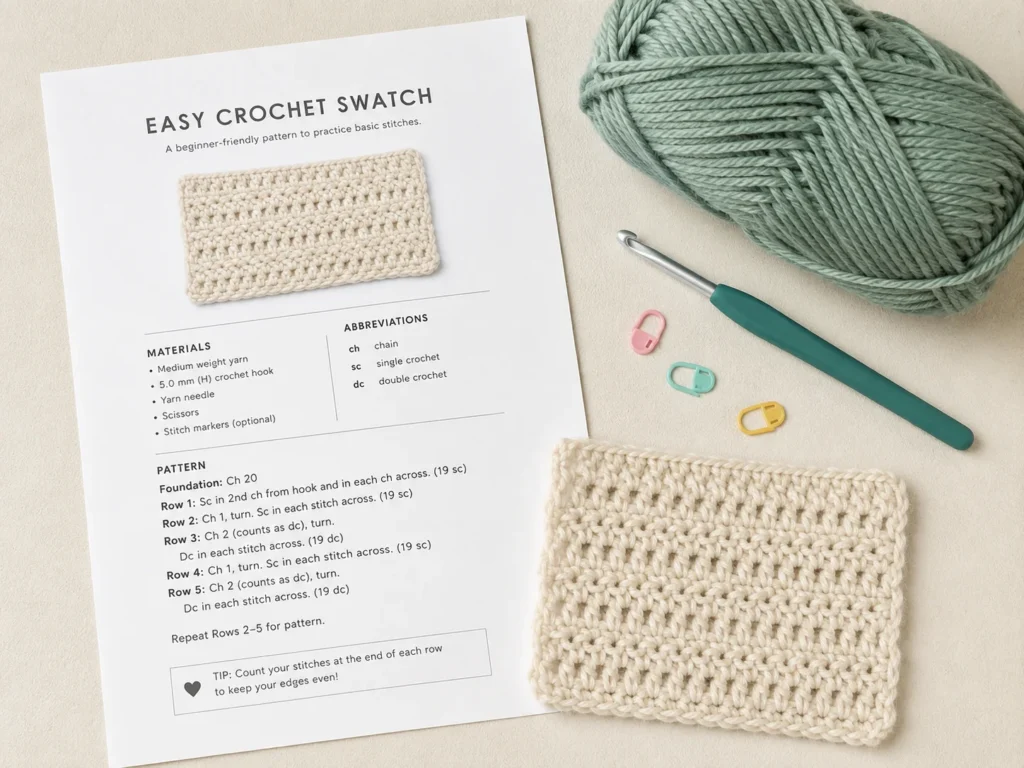
Written patterns use abbreviations to keep instructions shorter and easier to scan. Individual designers may also use special abbreviations, which should be explained somewhere in the pattern. Learning how to read crochet patterns starts with knowing what each part of the pattern is telling you.
The Easiest Way to Decode Any Crochet Instruction
Break each line into five questions:
- What stitch do I make?
- Where do I put it?
- How many times do I do it?
- Is anything being skipped or repeated?
- How many stitches should I have when I finish?
For example:
Sc in next 3 sts.
means:
- Sc: make a single crochet
- in next 3 sts: work one single crochet into each of the next three stitches
You make three single crochets total, not three single crochets in each stitch.
That small difference is one of the easiest ways for a beginner to accidentally increase the stitch count.
How to Read Crochet Patterns for Beginners: 4 Easy Steps
Step 1: Check Whether the Pattern Uses U.S. or U.K. Crochet Terms
Do this before making your first stitch.
U.S. and U.K. crochet patterns use some of the same stitch names differently.
| U.S. term | U.K. equivalent |
|---|---|
| Slip stitch | Slip stitch |
| Single crochet | Double crochet |
| Half double crochet | Half treble |
| Double crochet | Treble |
| Treble crochet | Double treble |
Because Lia Crafts is written for a U.S. audience, the tutorials on this site use U.S. crochet terminology unless stated otherwise.
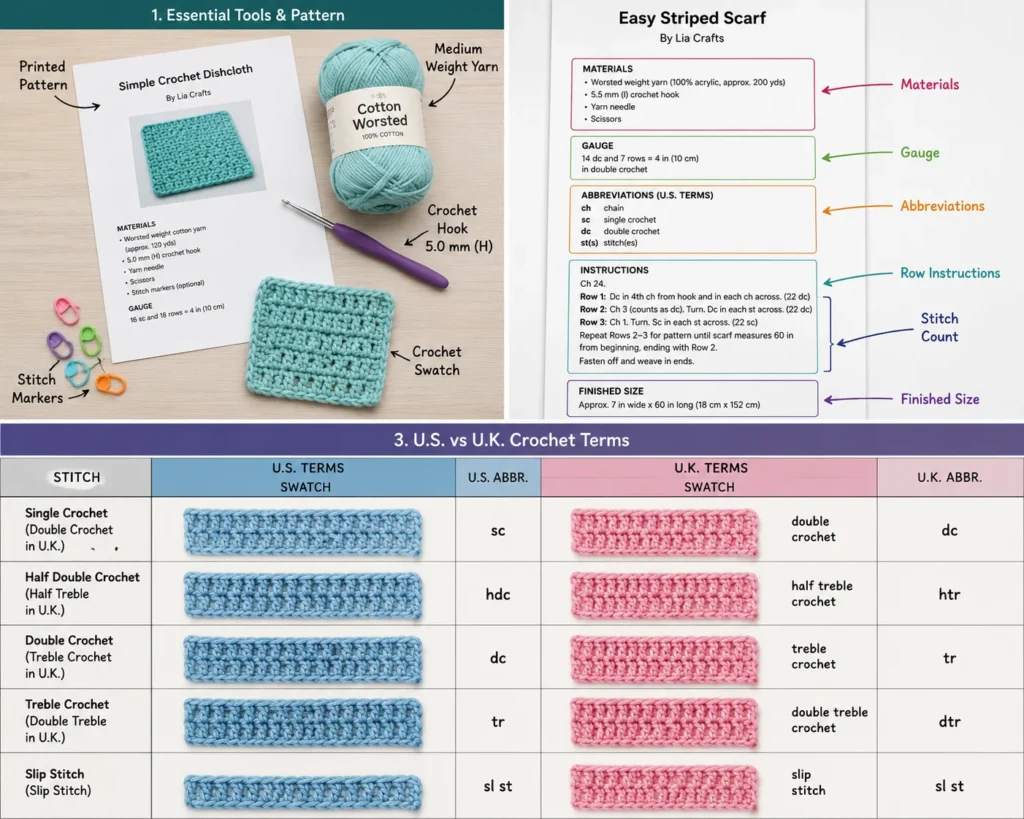
Beginner mistake to avoid: Never assume a pattern uses U.S. terminology just because it is written in English. Check the notes or abbreviation section first.
Step 2: Read the Pattern Information Before Starting
It is tempting to skip straight to Row 1, but read the information above the instructions first.
Look for:
- project size
- yarn weight
- required yardage
- hook size
- gauge
- stitch markers or other tools
- special stitches
- whether you work in rows or rounds
- whether rounds are joined or continuous
- whether turning chains count as stitches
If basic crochet stitches still feel unfamiliar, start with our How to Crochet for Absolute Beginners: A Simple Step-by-Step Guide before following a written pattern.
Visual checkpoint: Before beginning, you should know which yarn, hook, terminology, size, and construction method the pattern expects.
Step 3: Check the Gauge When Finished Size Matters
Gauge tells you how many stitches and rows should fit within a specific measurement.
A pattern might say:
Gauge: 14 sc and 16 rows = 4 in.
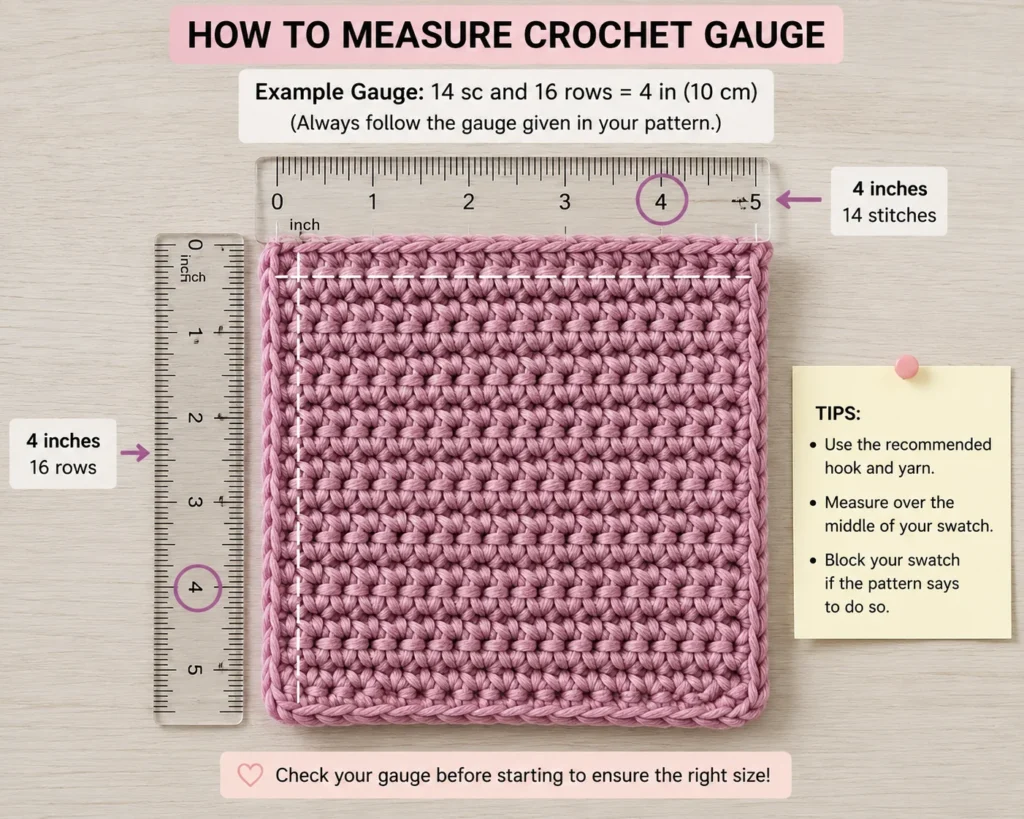
That means a 4-inch section should contain approximately 14 single crochet stitches across and 16 rows vertically.
If your swatch is:
- too small: try a larger hook
- too large: try a smaller hook
Gauge matters most for projects where the finished size needs to be accurate, including sweaters, hats, fitted accessories, and garments.
For a simple practice washcloth or coaster, a small gauge difference may not ruin the project, although it can still change the final size.
Beginner mistake to avoid: Do not automatically choose a larger hook simply because you want a larger garment. For sized patterns, first try to match the pattern gauge and then follow the instructions for the correct size.
Step 4: Learn the Most Common Crochet Abbreviations
You do not need to memorize every crochet abbreviation before following a pattern.
Start with these:
| Abbreviation | Meaning |
|---|---|
| ch | chain |
| sl st | slip stitch |
| sc | single crochet |
| hdc | half double crochet |
| dc | double crochet |
| tr | treble crochet |
| st / sts | stitch / stitches |
| sp | space |
| ch-sp | chain space |
| sk | skip |
| rep | repeat |
| rnd | round |
| inc | increase |
| dec | decrease |
| tog | together |
| RS | right side |
| WS | wrong side |
| FLO | front loop only |
| BLO | back loop only |
| yo | yarn over |
You can also check the Craft Yarn Council’s standard crochet abbreviations for a larger reference list.
Keep the pattern’s abbreviation list nearby because designers sometimes use project-specific terms.
What Does “ch-1 sp” Mean?
A ch-1 sp, or chain-1 space, is the open space created by a chain stitch from the previous row or round.
If a pattern says:
3 dc in next ch-1 sp
insert the hook into the open space beneath the chain and work three double crochets there.
Do not automatically work into the chain stitch itself unless the pattern specifically tells you to.
Chain spaces are common in granny squares. You can practice identifying them in our Granny Squares for Beginners: Easy Step-by-Step Guide.
What Do Asterisks, Brackets, and Parentheses Mean?
Crochet patterns use punctuation to avoid repeating long instructions.
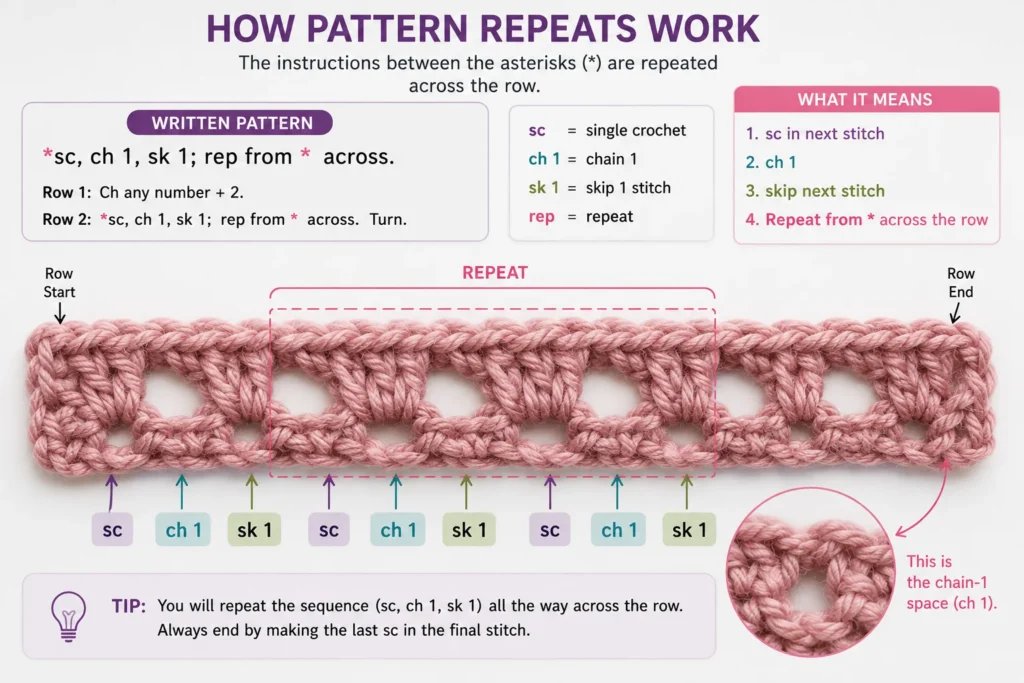
Asterisk: *
An asterisk usually marks the beginning of a repeat.
Example:
*Sc in next st, ch 1, sk next st; rep from * across.
Read it like this:
- Single crochet in the next stitch.
- Chain 1.
- Skip the next stitch.
- Return to the asterisk.
- Repeat those actions across the row.
Double Asterisks: **
Some patterns use double asterisks to mark another repeat section inside a larger sequence.
Because designers may format repeats differently, always check the pattern notes when both single and double asterisks are used.
Brackets: [ ]
Brackets usually group several instructions together.
For example:
[Sc, ch 2, sc] in next ch-2 sp.
All three actions go into the same chain-2 space:
- one single crochet
- chain 2
- another single crochet
Parentheses: ( )
Parentheses can show:
- stitch counts
- grouped instructions
- repeat information
- different numbers for different sizes
For example:
(24 sts)
usually means that you should have 24 stitches when the row or round is complete.
How to Read One Crochet Pattern Line Without Getting Lost
Instead of reading a crochet pattern like normal prose, divide it into separate actions.
As you learn how to read crochet patterns, these short phrases will start to feel much more familiar.
Consider this example:
Row 3: Ch 1, turn. Sc in next 2 sts, 2 sc in next st, sc in next 3 sts. (7 sts)
Here is what it means.
Row 3
You are beginning the third row.
Ch 1
Make one chain.
Turn
Turn your crochet piece so you can work back across the previous row.
Sc in next 2 sts
Work one single crochet into each of the next two stitches.
You have made 2 stitches.
2 sc in next st
Work two single crochets into the same next stitch.
This creates an increase.
You have now made 4 stitches total.
Sc in next 3 sts
Work one single crochet into each of the next three stitches.
Your total is now:
2 + 2 + 3 = 7 stitches.
(7 sts)
This is your checkpoint.
Count your stitches before moving to the next row.
You should have seven.
Use the “Action + Location” Rule
Most crochet instructions are easier to understand when you separate the action from the location.
| Pattern says | Action | Location |
|---|---|---|
| sc in next st | make 1 sc | next stitch |
| dc in next 3 sts | make 3 dc | one in each of next 3 stitches |
| 3 dc in next st | make 3 dc | all in the same stitch |
| sc in ch-2 sp | make 1 sc | chain-2 space |
| sk next st | make nothing | skip one stitch |
| sl st in first sc | make slip stitch | first single crochet |
| sc in BLO | make single crochet | back loop only |
| dc around next post | make double crochet | around stitch post |
Pay special attention to the difference between:
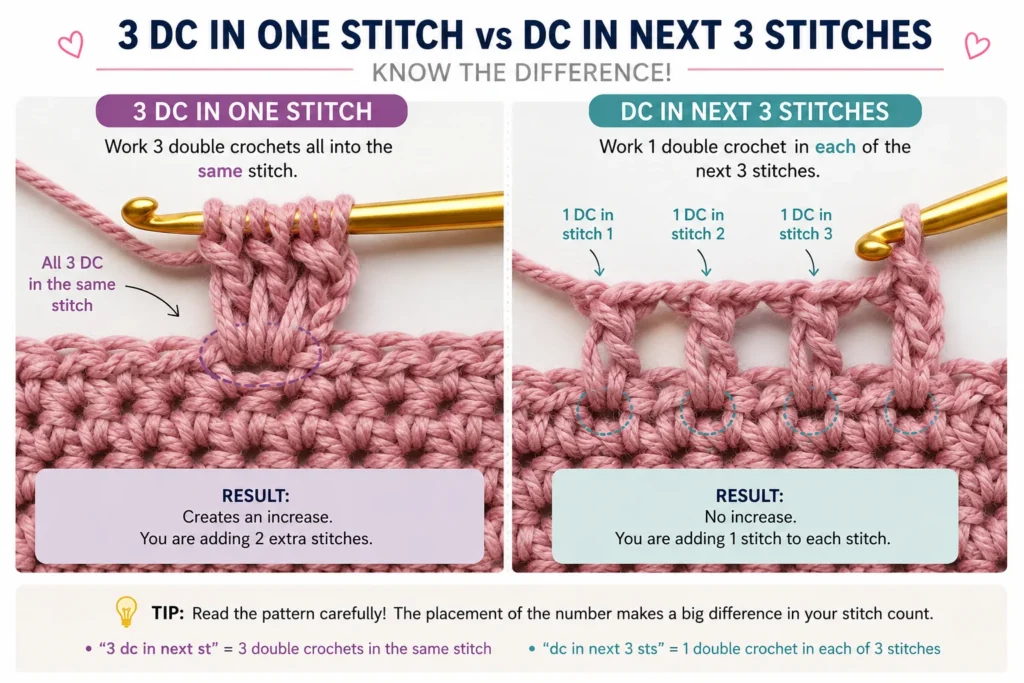
dc in next 3 sts
and:
3 dc in next st
The first instruction uses three different stitches.
The second puts all three double crochets into one stitch.
Understand What “Next Stitch” Means
The next stitch is normally the next unworked stitch from the previous row or round.
Look at the top edge of your crochet fabric. Most standard stitches form a V shape at the top.
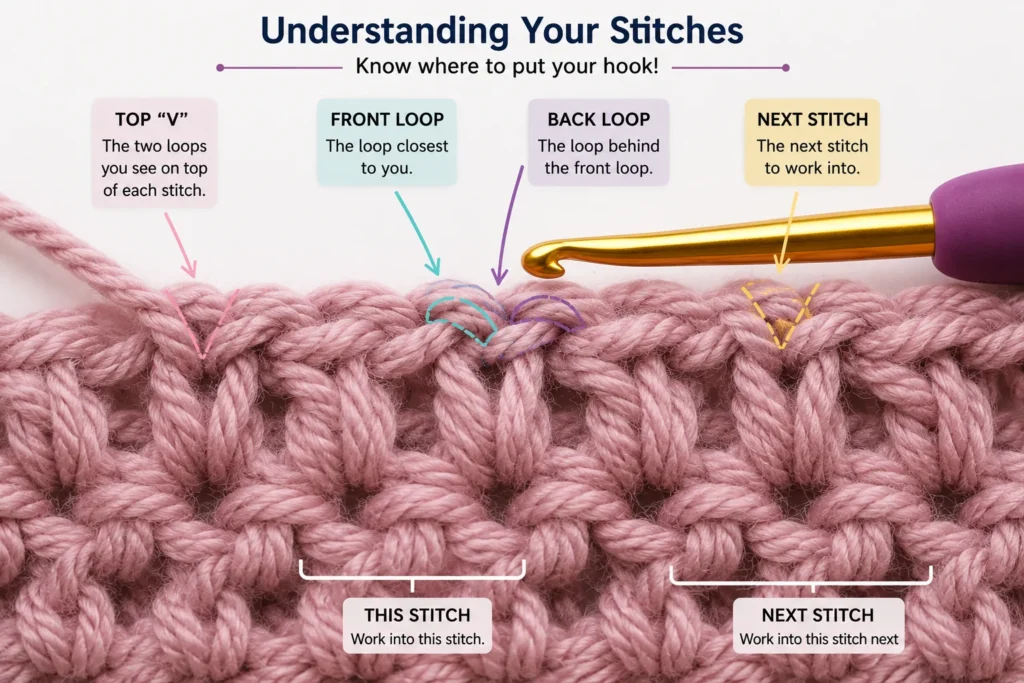
Unless the pattern says FLO, BLO, chain space, post stitch, or gives another placement instruction, the hook usually goes beneath the top two loops of the specified stitch.
Does the Turning Chain Count as a Stitch?
Sometimes it does, and sometimes it does not.
A pattern may say:
- “Ch 2 does not count as a stitch.”
- “Beginning ch-3 counts as first dc.”
- “Turning chain does not count throughout.”
This matters because it changes where you make the first and last stitch of each row.
Do not use one turning-chain rule for every project.
A Useful Edge Check
If your project becomes narrower, you may be:
- missing the first stitch
- missing the last stitch
- skipping stitches accidentally
If your project becomes wider, you may be:
- working into the edge twice
- counting a turning chain incorrectly
- accidentally increasing
A stitch marker in the first and last stitch can make straight edges much easier to maintain.
How to Read Crochet Rows
Patterns worked back and forth usually use rows.
Example:
Row 1: instructions
Row 2: instructions
Row 3: instructions
At the end of a row, the pattern may tell you to turn.
Some patterns also use:
- RS: right side
- WS: wrong side
The right side is generally the intended outward-facing side of the finished piece, while the wrong side faces inward or toward the back.
How to Read Crochet Rounds
Projects such as hats, granny squares, baskets, circles, and amigurumi may be crocheted in rounds.
There are two common methods.
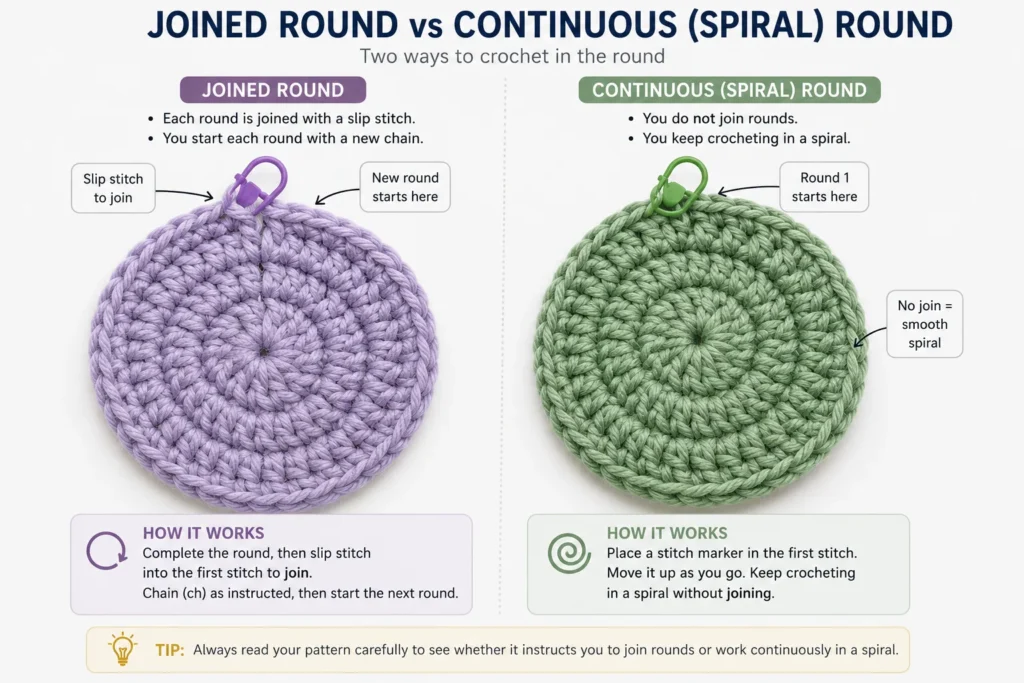
Joined Rounds
You work around the project and then connect the end of the round to its beginning.
A pattern may say:
Join with sl st to first sc.
Insert the hook into the specified first stitch and make a slip stitch to close the round.
Continuous Rounds
Instead of joining each round, you keep crocheting in a spiral.
Because the beginning of a round can be difficult to see, place a stitch marker in the first stitch.
Continuous rounds are common in amigurumi. You can see how this method works in How to Make Amigurumi for Beginners: Your First Crochet Animal.
How to Count Crochet Stitches Correctly
Stitch counts are useful checkpoints.
If a pattern ends a row with:
(36 sts)
stop and count.
If you have 35 or 37 stitches, finding the mistake now will be easier than discovering it several rows later.
Do Not Count the Working Loop
The loop currently sitting on your crochet hook is not a completed stitch.
What About Chains?
Whether a chain counts depends on its purpose.
It may be:
- part of the foundation chain
- a turning chain
- part of the stitch pattern
- a chain space
- counted as a stitch by that particular pattern
Always follow the instructions given in the pattern.
How to Read Crochet Patterns With Several Sizes
Garment patterns often give several numbers on one line.
For example:
Ch 72 (80, 88, 96).
The numbers might correspond to:
S (M, L, XL)
If you are making size L, choose the third number each time.
In this example:
- S = 72
- M = 80
- L = 88
- XL = 96
Easy Beginner Method
Before starting:
- Find your selected size.
- Highlight or circle its number.
- Keep using the same position in each group of size numbers.
Do not choose a crochet garment size only from the clothing size you normally buy.
Compare your body measurements with the pattern’s size chart and finished measurements.
How to Read Crochet Charts and Symbols
Some patterns use charts instead of, or alongside, written instructions.
Each chart symbol represents a stitch.
Common symbols may represent:
- chain
- slip stitch
- single crochet
- half double crochet
- double crochet
- treble crochet
- increases
- decreases
- clusters
- shells
- popcorn stitches
- post stitches
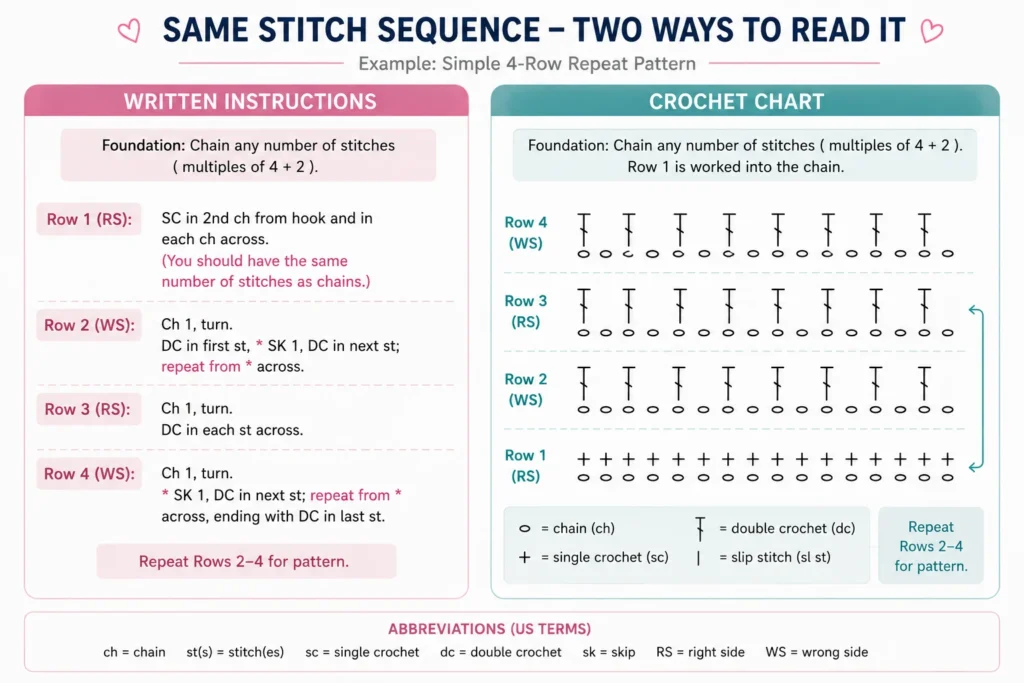
Always check the chart key supplied with the individual pattern, especially if it contains unusual stitches.
Why Crochet Charts Can Be Helpful
Charts show the relationship between stitches visually.
For example, if three double crochet symbols come from one chain space, you can immediately see that all three stitches belong in the same location.
Charts can be especially helpful for:
- granny squares
- lace
- motifs
- repeated stitch patterns
Common Crochet Pattern Phrases Translated
“Across”
Continue following the instruction until you reach the end of the row.
“Around”
Continue around a circular piece.
“Rep”
Repeat.
“Rep from *”
Return to the asterisk and repeat the instructions from that point.
“Sk next st”
Skip the next stitch without working into it.
“In each st across”
Work the stated stitch into each remaining stitch.
“In same st”
Work into the stitch or space you just used again.
“Join”
Connect your current position to the stitch specified by the pattern.
“Work even”
Continue without increasing or decreasing.
“Fasten off”
Secure the working yarn so the crochet does not unravel, leaving enough yarn for weaving in or joining if needed.
“PM”
Place marker.
“BLO”
Work in the back loop only.
“FLO”
Work in the front loop only.
What to Do Before Starting Each New Row
Try this simple routine:
- Read the entire row before crocheting.
- Find any asterisks, brackets, increases, decreases, or skipped stitches.
- Notice the expected stitch count.
- Crochet one instruction at a time.
- Count your stitches when the row is finished.
Small words such as skip, same, next, and repeat can completely change where a stitch should go.
Common Problems When Reading Crochet Patterns
My Row Keeps Getting Wider
Possible causes include:
- working twice into an edge stitch
- counting a turning chain incorrectly
- accidentally making extra increases
- misunderstanding “2 sc in next st”
Fix: Compare your current stitch count with the number given in the pattern.
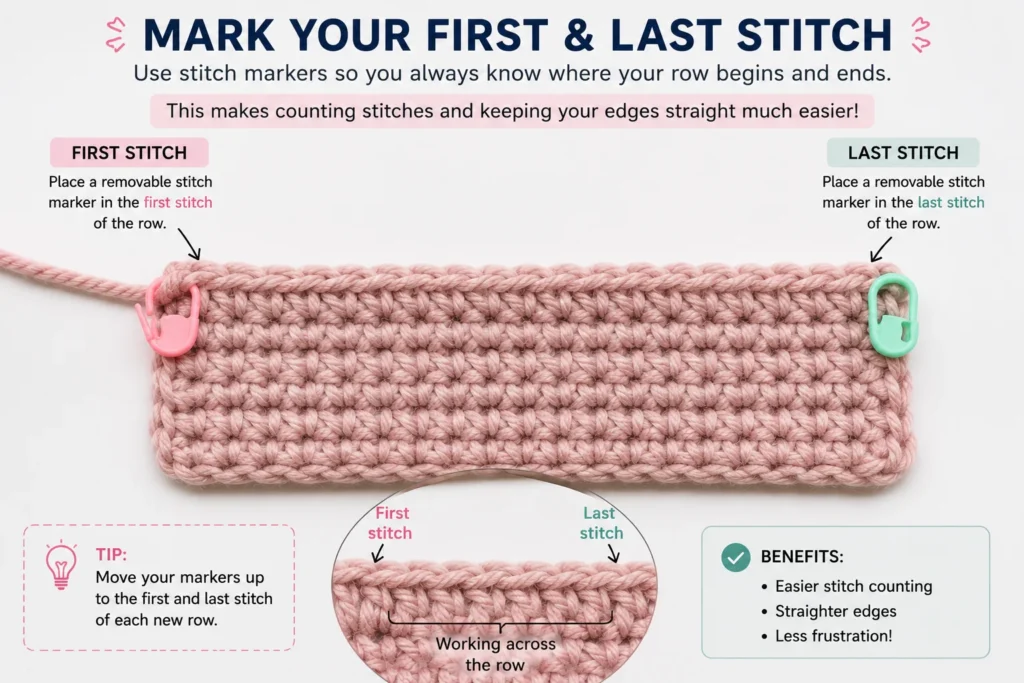
My Project Keeps Getting Narrower
Possible causes include:
- skipping the first stitch
- missing the last stitch
- accidentally skipping stitches
- not working into a turning chain when the pattern expects you to
Place a removable stitch marker in the first and last stitch until you become comfortable recognizing the edges.
My Repeat Does Not Fit at the End of the Row
Do not force another repeat.
Check:
- Did you begin with the correct number of stitches?
- Did you accidentally skip a stitch?
- Did you work several stitches into one stitch by mistake?
- Did you miss an increase or decrease?
- Does the instruction say “repeat to last X stitches” rather than “across”?
A repeat that does not fit often means something was misread earlier in the row.
I Cannot Tell Where the Next Stitch Is
Gently stretch the top edge of the fabric and look for the V-shaped stitch tops.
Stitch markers can help identify:
- the first stitch
- the last stitch
- beginning of a round
- corners
- repeat boundaries
Smooth, light-colored yarn is often easier for beginners to see than very dark or fuzzy yarn.
My Crochet Looks Correct but the Size Is Wrong
Check your gauge.
Two crocheters can follow the same pattern with the same yarn and hook but produce different sizes because their tension may be different.
For sized projects, make a gauge swatch before starting the full project.
A Simple Beginner Practice Pattern to Decode
Try reading this before you pick up your hook:
Ch 12.
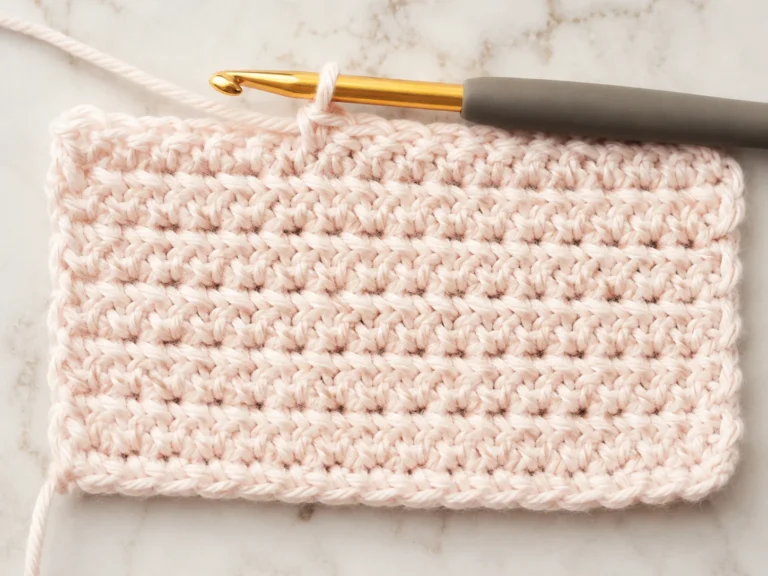
Row 1: Sc in 2nd ch from hook and in each ch across. Turn. (11 sc)
Translate it:
- Make 12 chains.
- Do not count the working loop on the hook as a chain.
- Count back to the second chain from the hook.
- Work one single crochet into that chain.
- Work one single crochet into every remaining chain.
- Turn the work.
- Count your stitches.
- You should have 11 single crochets.
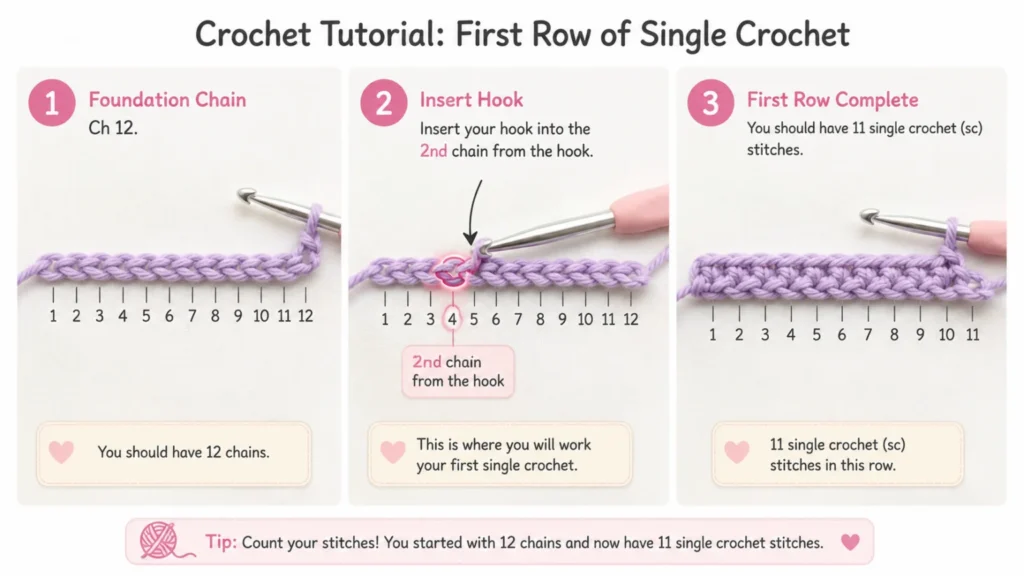
If you can turn that single line into individual physical actions, you are already beginning to read crochet patterns rather than simply memorizing abbreviations.
A Better Way to Practice Reading Crochet Patterns
Your first pattern does not need to be a sweater.
Choose a project that:
- uses one or two basic stitches
- has short rows or rounds
- gives stitch counts
- uses one yarn color
- has few or no size changes
- clearly explains abbreviations
- includes photos or a chart if possible
Good beginner choices include:
- washcloth
- coaster
- simple scarf
- basic granny square
- small pouch
- beginner amigurumi shape
A short project gives you more opportunities to practice reading instructions without investing hours before discovering a mistake.
Beginner Crochet Pattern Checklist
Before starting, check:
- Is the pattern written in U.S. or U.K. terms?
- Which size am I making?
- Do I have the correct yarn weight?
- Which hook size is recommended?
- Does gauge matter for this project?
- Do I understand the abbreviations?
- Does the turning chain count as a stitch?
- Am I working in rows, joined rounds, or continuous rounds?
- Where does each repeat begin and end?
- Is there a stitch count I can check?
Resolve anything unclear before beginning that section of the pattern.
Frequently Asked Questions
Do I Need to Memorize All Crochet Abbreviations?
No. Learn the most common basic abbreviations and keep a reference nearby. Unusual stitches and project-specific abbreviations can be checked when you encounter them.
What Does * Mean in a Crochet Pattern?
An asterisk usually marks the beginning of instructions that should be repeated. Continue repeating from the asterisk until the pattern tells you where to stop.
What Does a Number Before a Stitch Mean?
It tells you how many times to make that stitch.
For example:
3 dc in next st
means three double crochets in the same stitch.
But:
dc in next 3 sts
means one double crochet in each of three separate stitches.
How Do I Know if a Pattern Uses U.S. or U.K. Terms?
Check the pattern notes or abbreviation list. One useful clue is the term “single crochet.” It is used in U.S. terminology, while the equivalent stitch is called double crochet in U.K. terminology.
Should Beginners Count Stitches After Every Row?
Yes, especially when the pattern gives a stitch count. Counting after each row helps you catch missing stitches, extra stitches, and incorrect repeats early.
Why Does a Crochet Pattern Not Explain Every Basic Step?
Most patterns assume that you already know basic actions such as making a slip knot, chaining, turning, and forming common stitches.
If those steps are still difficult, review our How to Crochet for Absolute Beginners: A Simple Step-by-Step Guide first.
Final Thoughts
The key to learning how to read crochet patterns is breaking each row or round into smaller instructions.
Start by identifying the terminology, yarn, hook, gauge, size, and construction method.
Then break every instruction into:
stitch + location + quantity + repeat + stitch-count checkpoint
When a row seems confusing, do not try to decode everything at once. Read one command, complete that action, check where the hook goes next, and continue.
After a few simple projects, abbreviations such as sc, ch, sk, rep, and sl st will start to feel much more natural.
4 Comments