
How to Make a Magic Ring in Crochet: Easy Beginner Tutorial
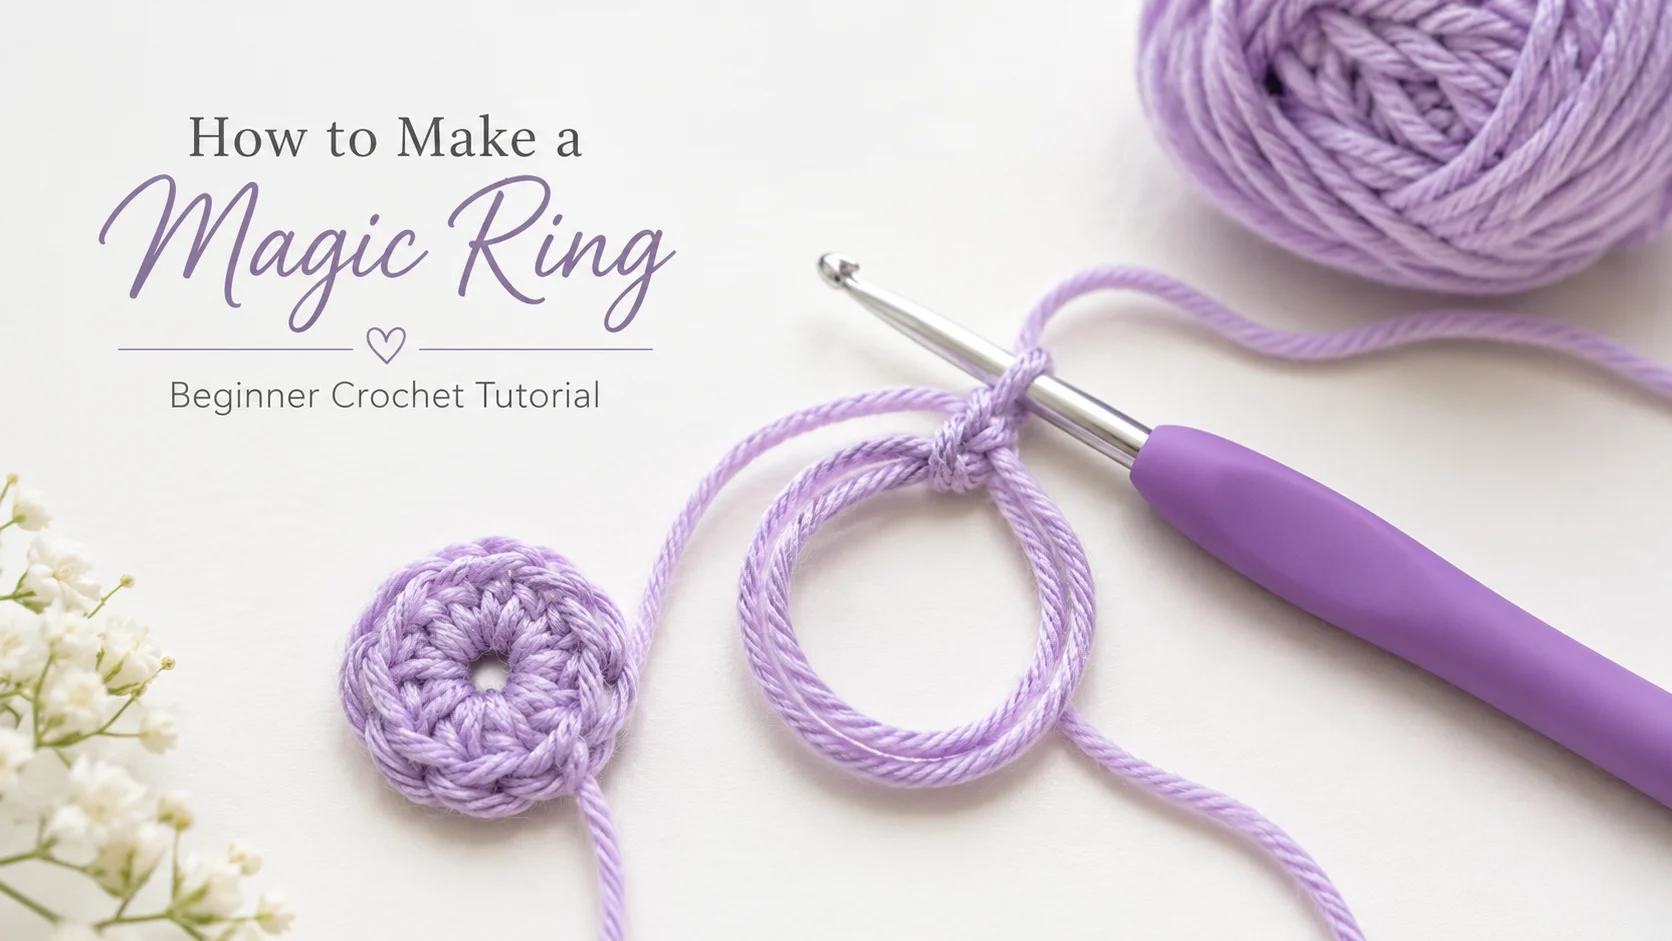
How to make a magic ring in crochet becomes much easier when you can see exactly where the yarn, hook, and first stitches should go. A magic ring creates an adjustable center that you can pull tightly closed, making it especially useful for amigurumi, crochet circles, and many granny-square patterns.
In this beginner tutorial, you’ll learn how to form the loop, work 6 single crochet stitches into it, close the center correctly, and fix the most common magic ring problems. You may also see this technique called a magic circle, magic loop, adjustable ring, or adjustable loop.
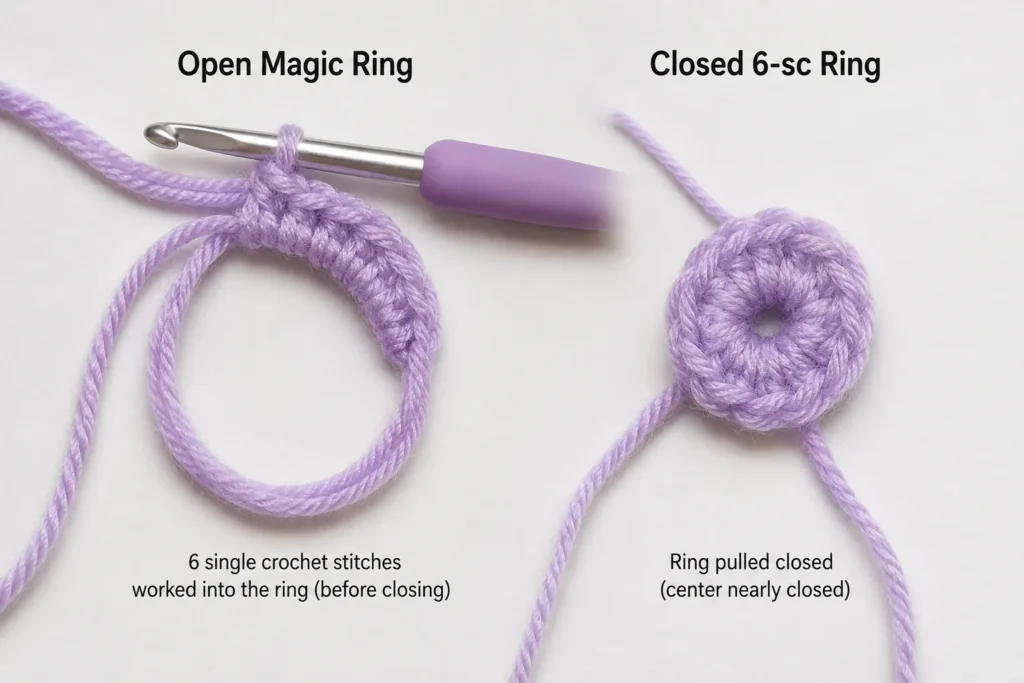
Below, you will practice a simple version with 6 single crochet stitches, so you can see exactly where the hook goes and what the finished ring should look like.
What Is a Magic Ring in Crochet?
A crochet magic ring is an adjustable loop used to begin crocheting in the round. You work the first round of stitches into the open loop, then pull the yarn tail to tighten the center.
The biggest advantage is that the middle can close much more tightly than a fixed chain ring. That makes it especially useful for amigurumi and other projects where you do not want a noticeable hole in the center.
You may also see the same technique called:
- Magic circle
- Magic loop
- Adjustable ring
- Adjustable loop
- Sliding loop
Learning how to make a magic ring in crochet is especially useful before starting amigurumi or other center-out projects.
What You Need
For practice, you only need:
- Smooth yarn
- Crochet hook
- Scissors
- Yarn needle
- Optional stitch marker
A smooth, light-colored medium-weight yarn is usually easier for beginners to see than black, fuzzy, or textured yarn.
If holding the hook, making a chain, or working single crochet is still difficult, start with How to Crochet for Absolute Beginners: A Simple Step-by-Step Guide.
Crochet Terms Used Here
This article uses U.S. crochet terms:
- ch = chain
- sc = single crochet
- sl st = slip stitch
- st/sts = stitch/stitches
- yo = yarn over
You can also check the Craft Yarn Council’s standard U.S. crochet abbreviations for a complete reference.
If pattern abbreviations still look confusing, see How to Read Crochet Patterns.
How to Make a Magic Ring in Crochet Step by Step
For this practice ring, you will make:
Magic ring, ch 1, 6 sc into ring, pull ring closed.
The easiest way to learn how to make a magic ring in crochet is to practice with six single crochet stitches first.
For another visual reference, Yarnspirations also demonstrates the adjustable magic loop technique.
The chain 1 in this example does not count as one of the six single crochet stitches.
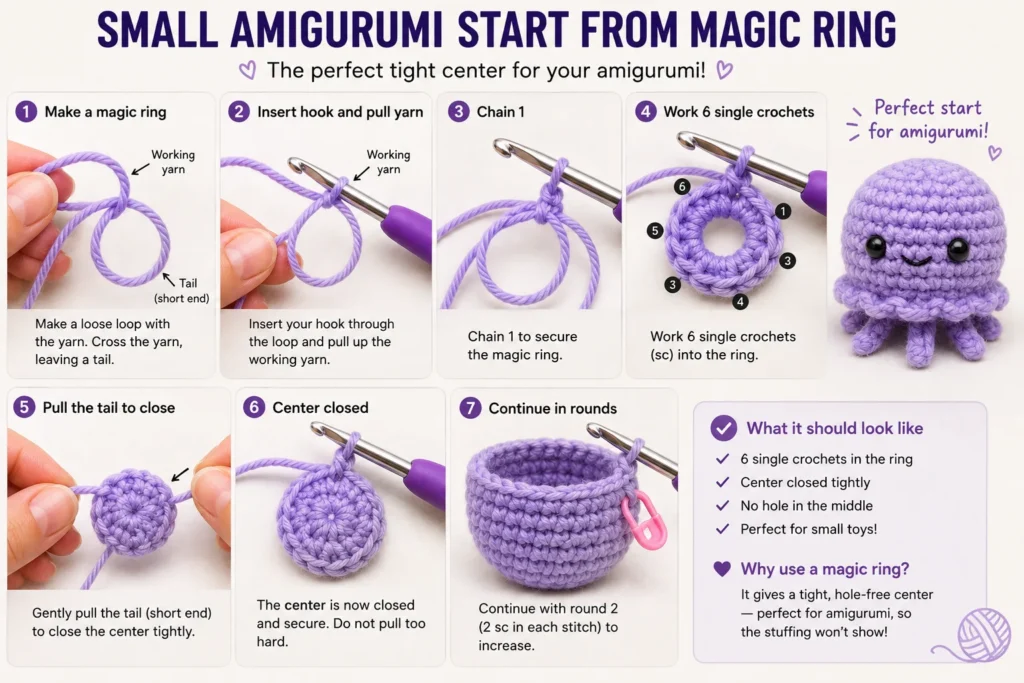
Step 1: Leave a Yarn Tail
Pull out about 6 to 8 inches of yarn before forming the ring.
The short loose end is your tail.
The strand that leads back to the yarn ball is the working yarn.
Leave enough tail to comfortably pull the ring closed and weave it in later.
Visual checkpoint: You should clearly see one short tail and one strand connected to the yarn ball.
Beginner mistake: Do not leave only an inch or two of yarn. A very short tail is difficult to pull and harder to weave in securely.
Step 2: Form a Loose Loop
Lay the yarn so the tail crosses underneath the working yarn and forms a loose circle.
Do not tie a knot.
Keep the loop large enough to easily insert your hook.
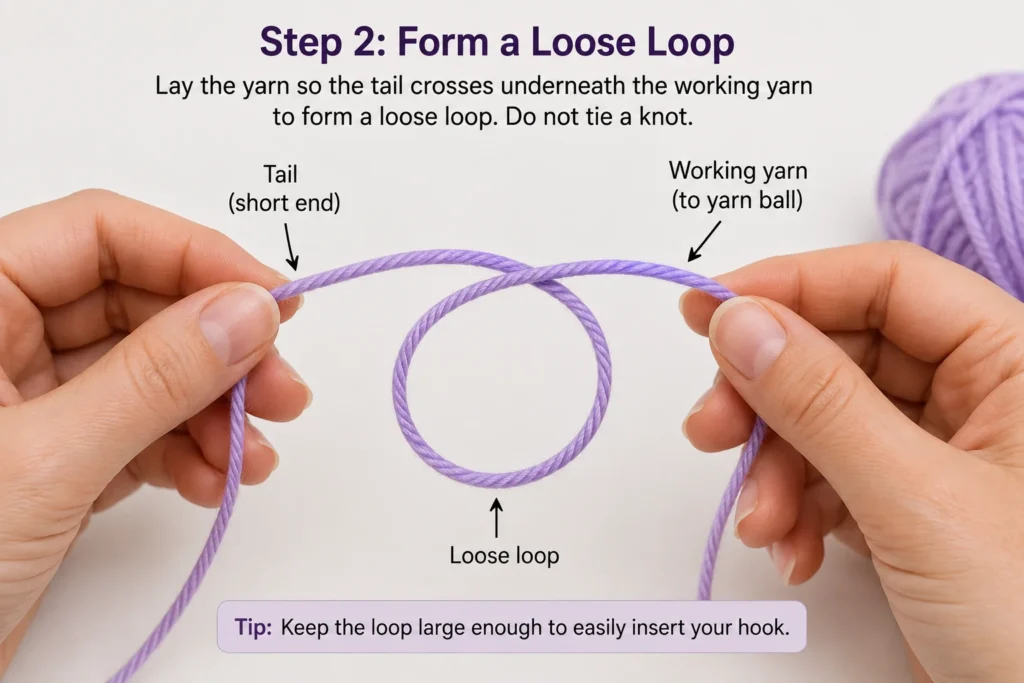
Visual checkpoint: You should have one open circle with the yarn strands crossing at one point.
Beginner mistake: Do not make a normal slip knot. You need a large adjustable loop, not a knot that tightens around the hook.
Step 3: Pull the Working Yarn Through the Loop
Insert your crochet hook through the center of the loop.
Catch the working yarn with your hook and pull it through the ring.
You should now have one loop on your hook.
Keep the large ring below the hook open.
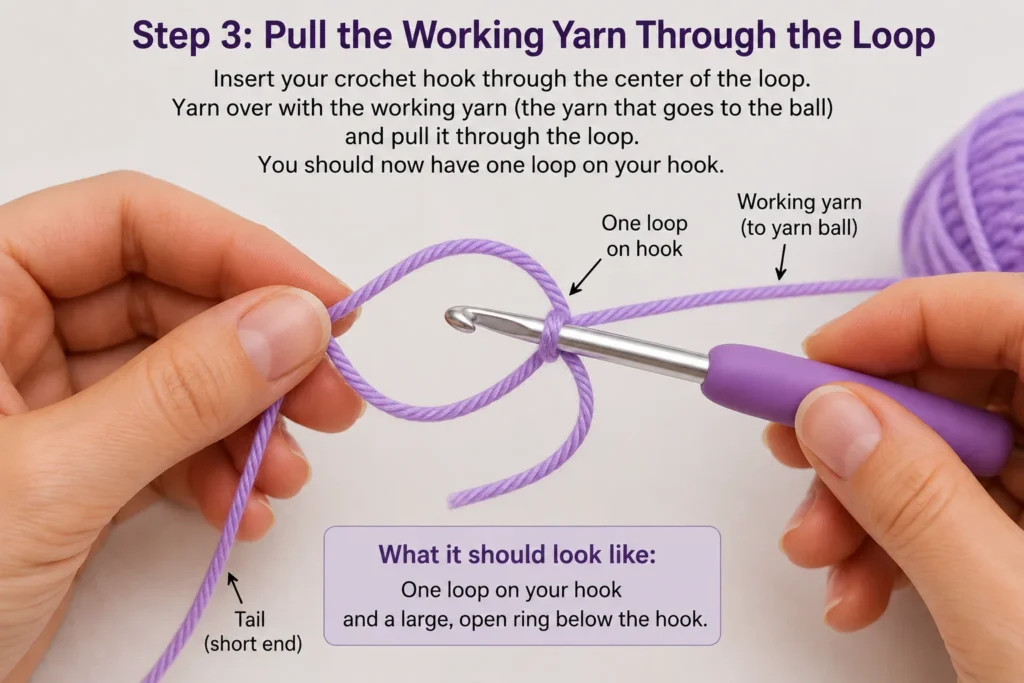
Visual checkpoint: One small loop sits on your hook while the large adjustable ring remains underneath.
Beginner mistake: Make sure you catch the working yarn, not the short tail.
Step 4: Chain 1
Yarn over with the working yarn.
Pull the yarn through the loop on your hook.
You have made chain 1.
This helps secure the ring so you can begin crocheting into it.
Keep the large ring loose and open.
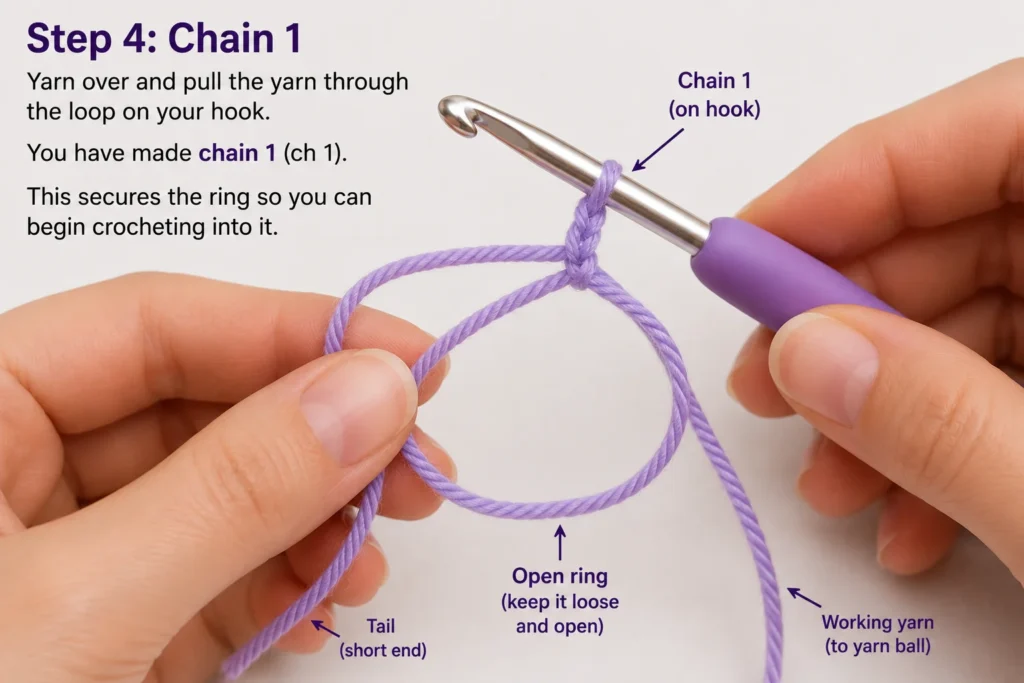
Visual checkpoint: There should be one small chain below your hook and a large open loop underneath.
Step 5: Insert the Hook Into the Center
Now insert your hook through the large center opening.
Do not insert the hook into the chain you just made.
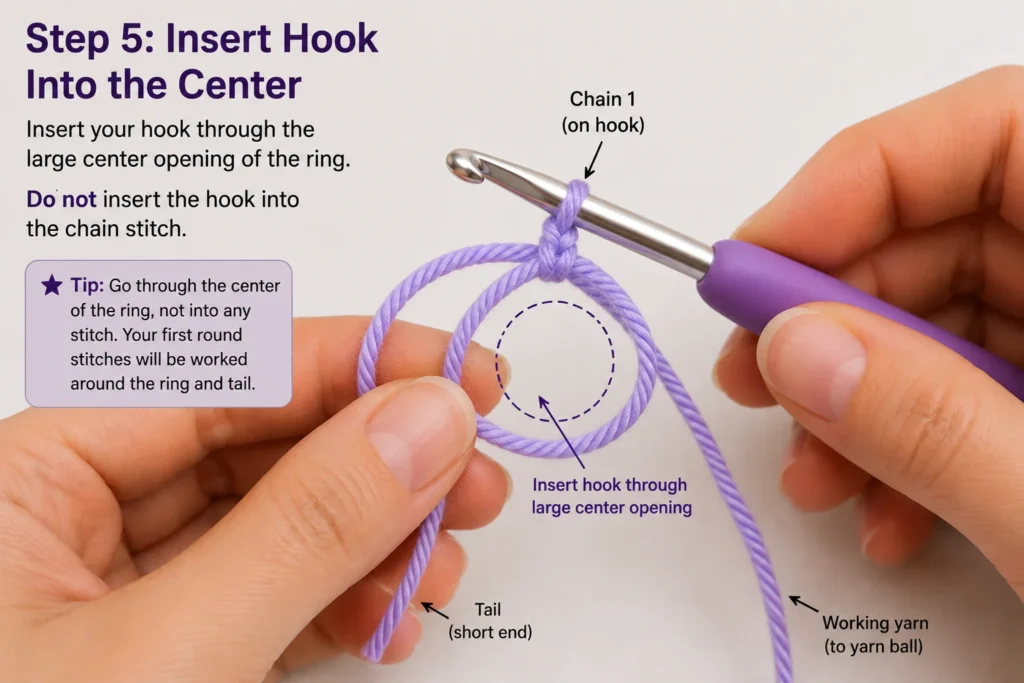
Your first-round stitches will be worked around the loop and tail.
This is one of the most common places beginners get confused.
Step 6: Make the First Single Crochet
With the hook inside the ring:
- Yarn over.
- Pull the yarn through the center.
You should now have 2 loops on your hook.
- Yarn over again.
- Pull through both loops.
You have made 1 single crochet.
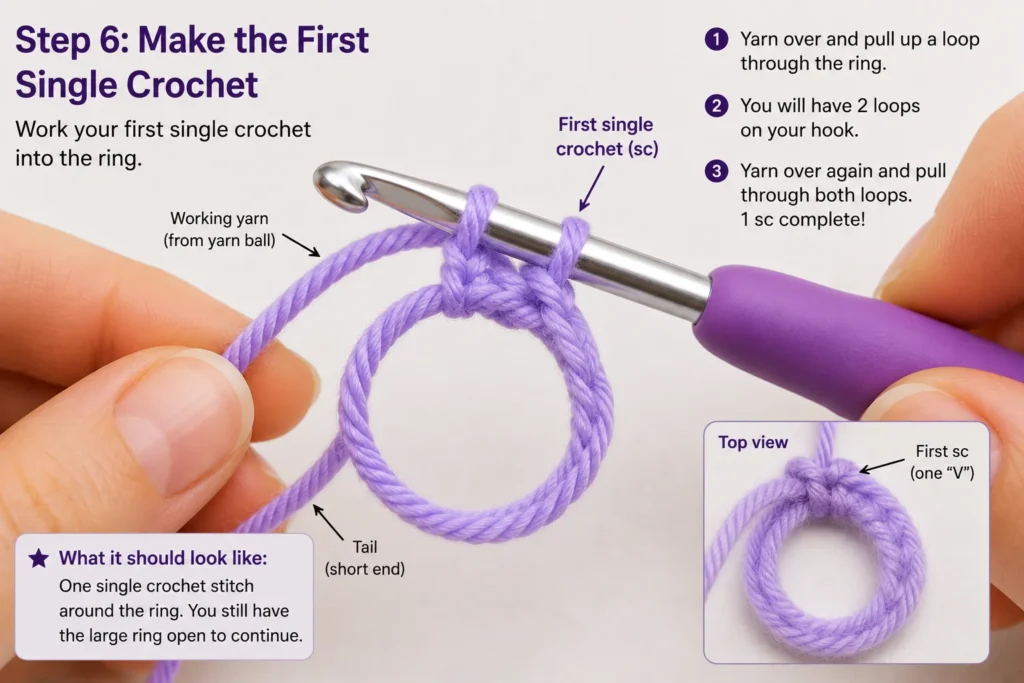
Visual checkpoint: One small stitch should now sit around the outside of the open ring.
Step 7: Make 5 More Single Crochet Stitches
Repeat the same process five more times:
- Insert your hook through the center.
- Yarn over.
- Pull up a loop.
- Yarn over.
- Pull through both loops.
You should now have:
6 single crochet stitches total.
Count the stitches before you close the ring.
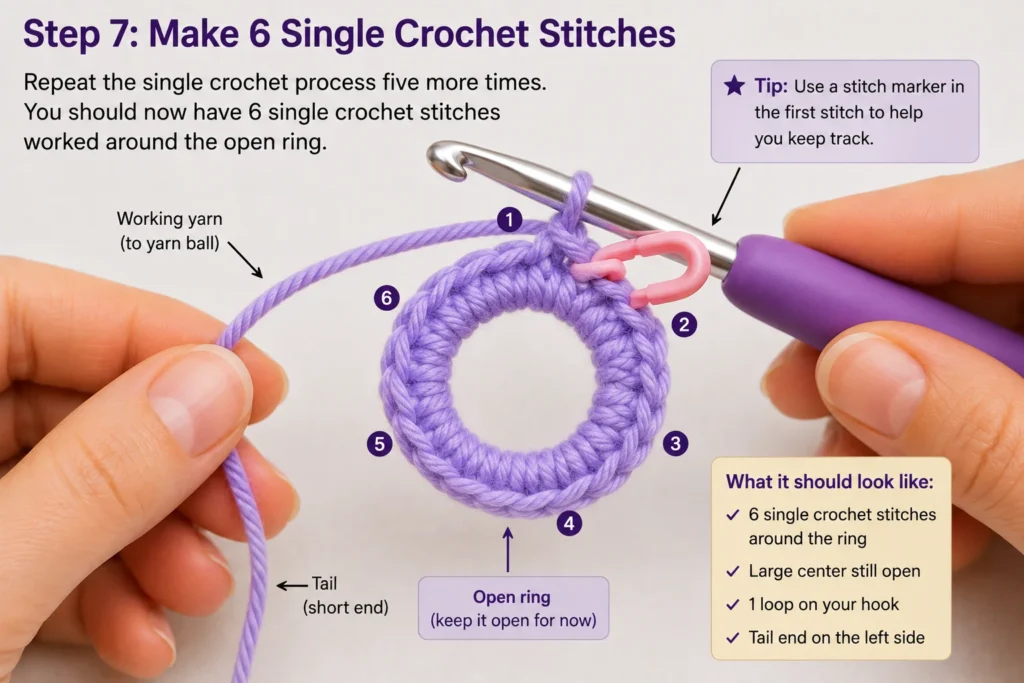
Visual checkpoint: Six small stitch tops should sit around the open loop.
Beginner mistake: Do not count the chain 1 as one of the six single crochet stitches.
A stitch marker placed in the first single crochet can make counting easier.
How to Close a Magic Ring
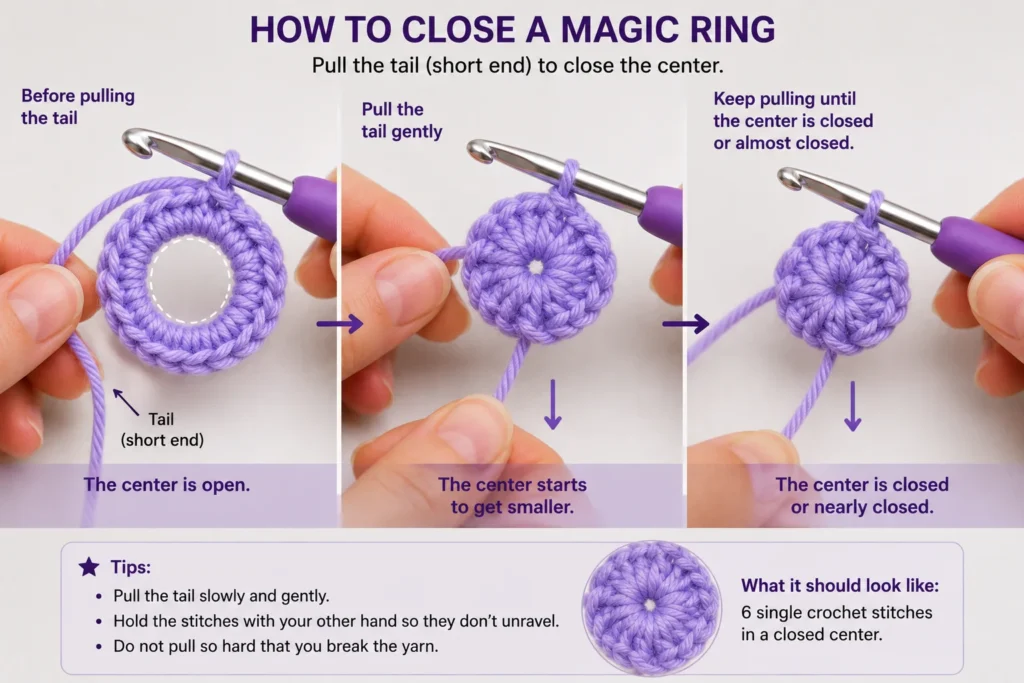
After making all six stitches, hold the stitches gently with one hand.
Use the other hand to pull the short yarn tail.
The large center loop should begin getting smaller.
Keep pulling gently until the stitches gather together and the center is closed or almost closed.
Do not yank hard enough to damage the yarn.
What the Closed Ring Should Look Like
After tightening:
- You should have six stitches in a small circle.
- The large original loop should be gone.
- The center hole should be tiny or completely closed.
- Your working loop should still be on the hook.
- The yarn tail should still be visible.
If there is still a noticeable hole, gently pull the tail again.
Do not cut the tail yet.
What Do You Do After Closing the Ring?
What happens next depends on your crochet pattern.
For Continuous Rounds
Amigurumi is often worked in continuous rounds.
You usually begin Round 2 directly in the first stitch of Round 1.
Place a stitch marker in the first stitch so you can easily see where each round begins.
For Joined Rounds
Some crochet patterns tell you to join the round with a slip stitch.
In that case, follow the pattern’s instructions for where to place the join.
Do not assume every project made in the round is worked the same way.
For a beginner amigurumi project, continue with How to Make Amigurumi for Beginners: Your First Crochet Animal.
Magic Ring vs. Chain Ring
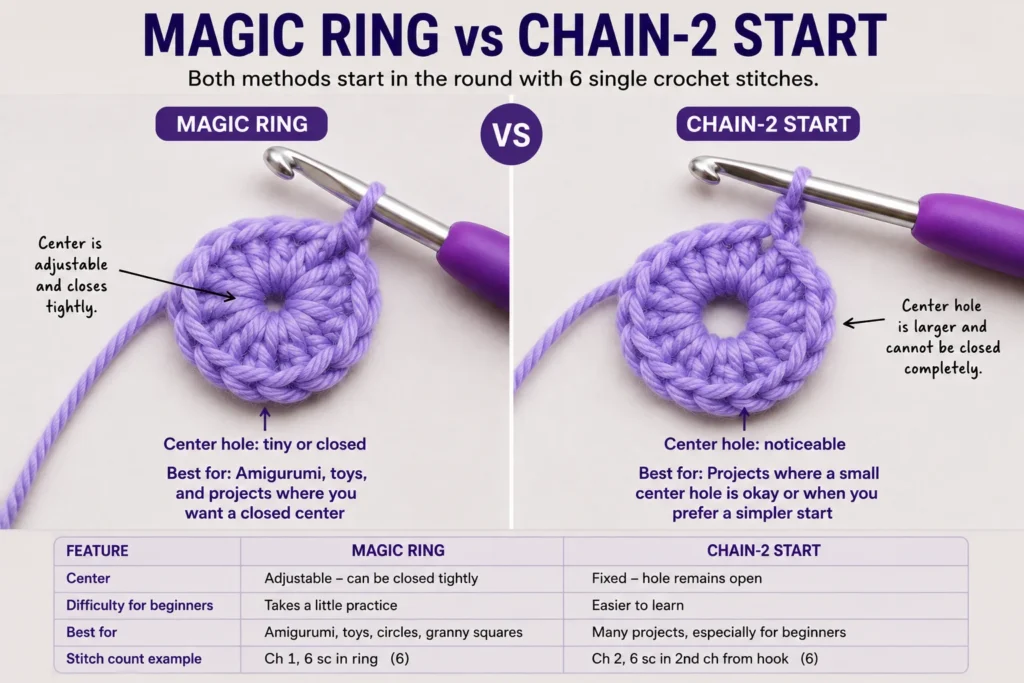
A magic ring is useful, but it is not your only option.
| Feature | Magic Ring | Chain Ring |
|---|---|---|
| Center | Adjustable | Fixed |
| Center can close tightly | Yes | Usually less tightly |
| Beginner difficulty | Takes practice | Easier |
| Good for amigurumi | Excellent | Useful alternative |
| Good for granny squares | Yes | Yes |
| Main advantage | Small center hole | Simple setup |
Easy Magic Ring Alternative
If the magic ring keeps frustrating you, try this method:
- Make a slip knot.
- Chain 2.
- Insert your hook into the second chain from the hook.
- Work 6 single crochet stitches into that chain.
The center may be slightly more visible, but this can still work well for many beginner projects.
Why Won’t My Magic Ring Close?
If pulling the tail does nothing, one of these problems is usually the cause.
You Made a Fixed Knot
The center needs to slide.
If you tied the loop into a fixed knot, it cannot shrink properly.
Fix: Undo the beginning and form a loose adjustable loop instead.
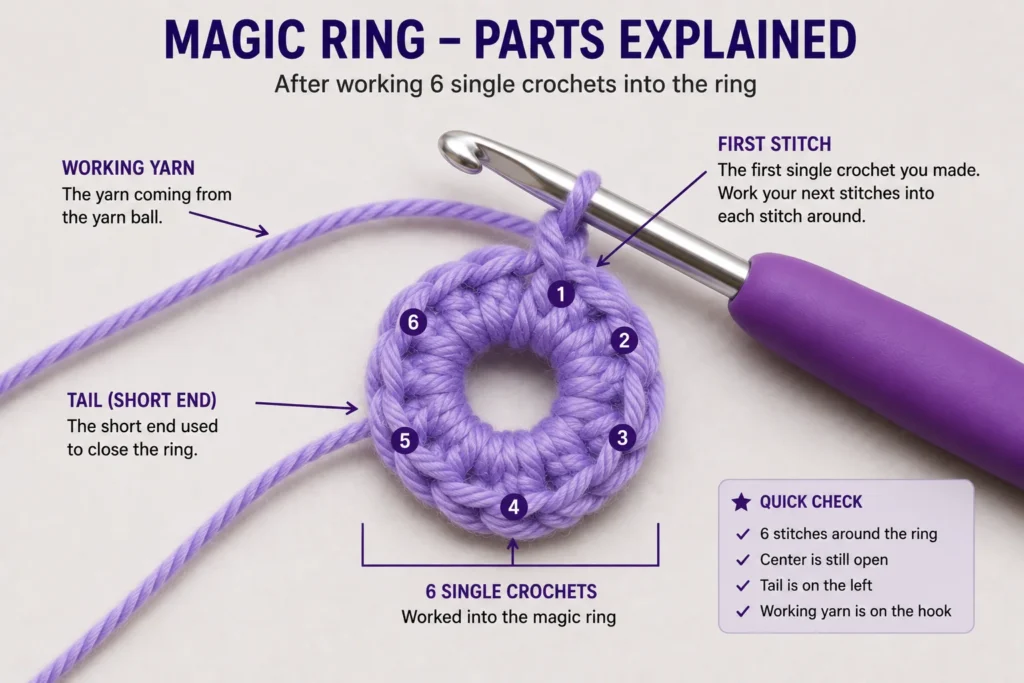
You Are Pulling the Wrong Strand
The working yarn goes back to the yarn ball.
The loose tail is the strand normally used to close the ring.
Fix: Find the loose end and pull it gently.
Your Hook Split the Yarn Tail
If your hook accidentally goes through the individual fibers of the tail instead of around it, the yarn may not slide smoothly.
Fix: Undo the affected stitches and remake them without piercing the yarn strand.
Your Stitches Are Too Tight
Very tight stitches can make the center difficult to close.
Fix: Loosen your first-round tension slightly and hold the stitches gently while pulling the tail.
You Closed the Ring Too Early
If you pull the center closed before finishing all the stitches, you may not have enough room to insert your hook.
Fix: Keep the ring open until the entire first round is complete.
Why Does My Magic Ring Come Undone?
Pulling the ring closed is only the first part.
Do not cut the yarn tail close to the center.
After you have worked enough of the project to handle it comfortably, use a yarn needle to weave the tail securely through the backs of several stitches.
Changing direction while weaving the tail can help keep it from slipping back out.
Magic Ring for Amigurumi
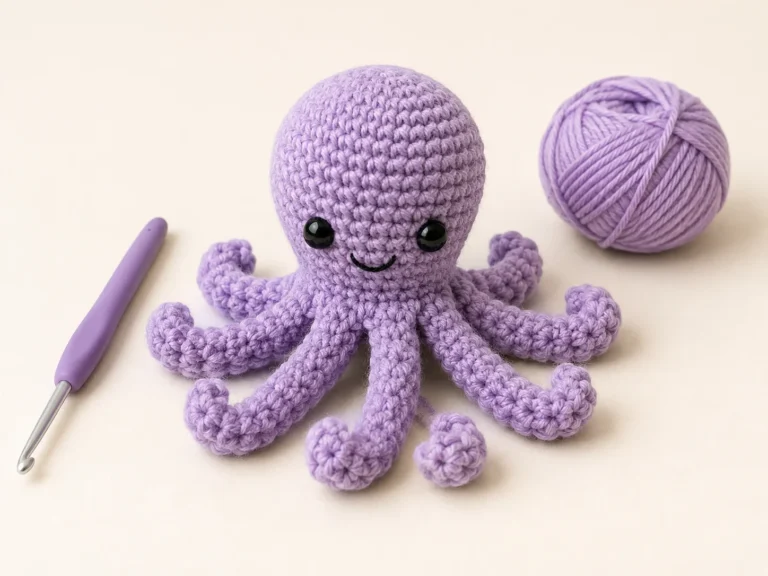
Magic rings are especially common in amigurumi because many crochet animals begin with a small circle of single crochet stitches.
A pattern may say:
R1: 6 sc in MR (6)
This means:
- Make a magic ring.
- Crochet 6 single crochet stitches into it.
- Pull the ring closed.
- You should have 6 stitches at the end of the round.
The number in parentheses is your expected stitch count.
For the next step, see How to Make Amigurumi for Beginners: Your First Crochet Animal.
Can You Use a Magic Ring for Granny Squares?
Yes.
Many granny squares can begin with a magic ring.
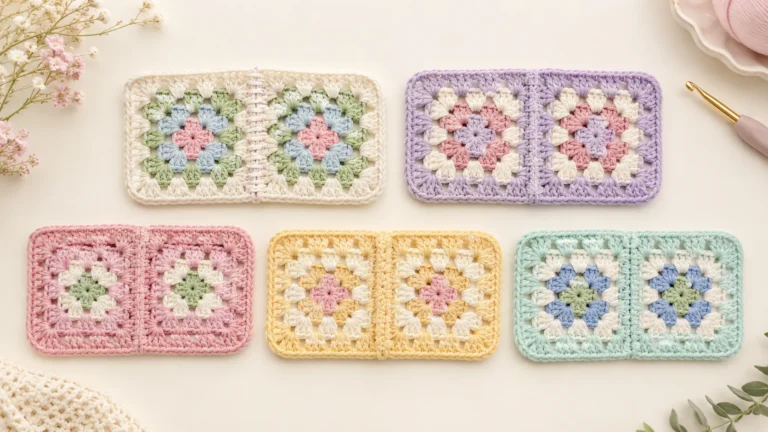
The difference is that you may crochet double crochet groups and chains into the center instead of six single crochet stitches.
For your next project, see Granny Squares for Beginners: Easy Step-by-Step Guide.
Always follow the stitch sequence in your granny-square pattern.
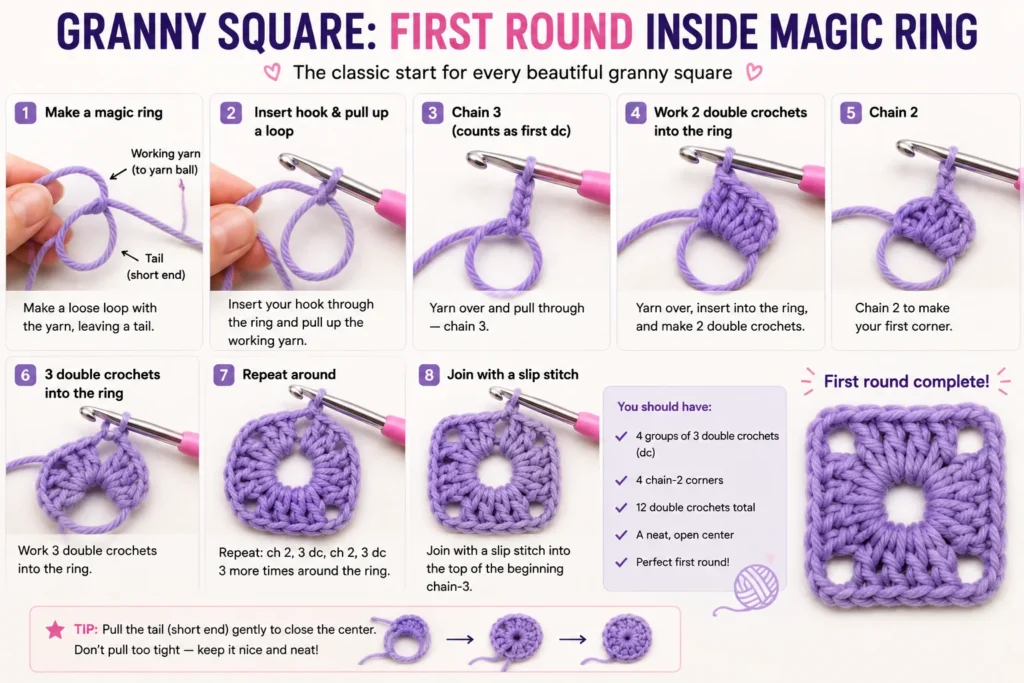
You can also continue with How to Join Granny Squares: 5 Easy Methods for Beginners once you have several squares ready.
Quick Magic Ring Checklist
Before starting the next round, make sure:
- You have the correct number of stitches.
- You did not count the securing chain by mistake.
- The tail successfully closed the center.
- You can identify the first stitch.
- You still have enough tail to weave in later.
If all five are correct, you are ready to continue.
Frequently Asked Questions
How long should the tail be for a crochet magic ring?
About 6 to 8 inches is a practical starting length for practice. It gives you enough yarn to grip while closing the center and enough tail to weave in afterward.
Does chain 1 count as a stitch?
In the six-single-crochet method shown in this article, no.
Other patterns may treat beginning chains differently, especially when using taller stitches, so always check the pattern instructions.
Can I work double crochet into a magic ring?
Yes.
A magic ring is simply an adjustable foundation. A pattern can tell you to work single crochet, half double crochet, double crochet, clusters, or other stitches into it.
Do I have to use a magic ring for amigurumi?
No.
The magic ring is popular because it can create a tightly closed center, but a chain-based starting method can work as an alternative for many projects.
Why is the magic ring harder with fuzzy yarn?
Fuzzy and textured yarn makes the strands and stitches harder to see. Some yarns also do not slide as easily as smooth yarn.
Practice with smooth yarn first if you are struggling.
Should I cut the tail after closing the ring?
No.
Leave enough tail to weave securely into the fabric after you have worked a few more rounds.
Final Takeaway
Now that you know how to make a magic ring in crochet, you can use the same adjustable-loop technique in many round-based projects.
To make a magic ring in crochet, form a loose adjustable loop, pull the working yarn through it, chain 1, work the required stitches into the center, and then pull the yarn tail to close the hole.
For your first practice attempt, 6 single crochet stitches make a simple and useful starting exercise.
Focus on three checkpoints: keep the ring open while you crochet, insert the hook through the large center, and make sure the loose tail slides when you pull it.
Once you can do those three things comfortably, you can use the same technique for amigurumi, crochet circles, and many granny-square projects.
2 Comments