
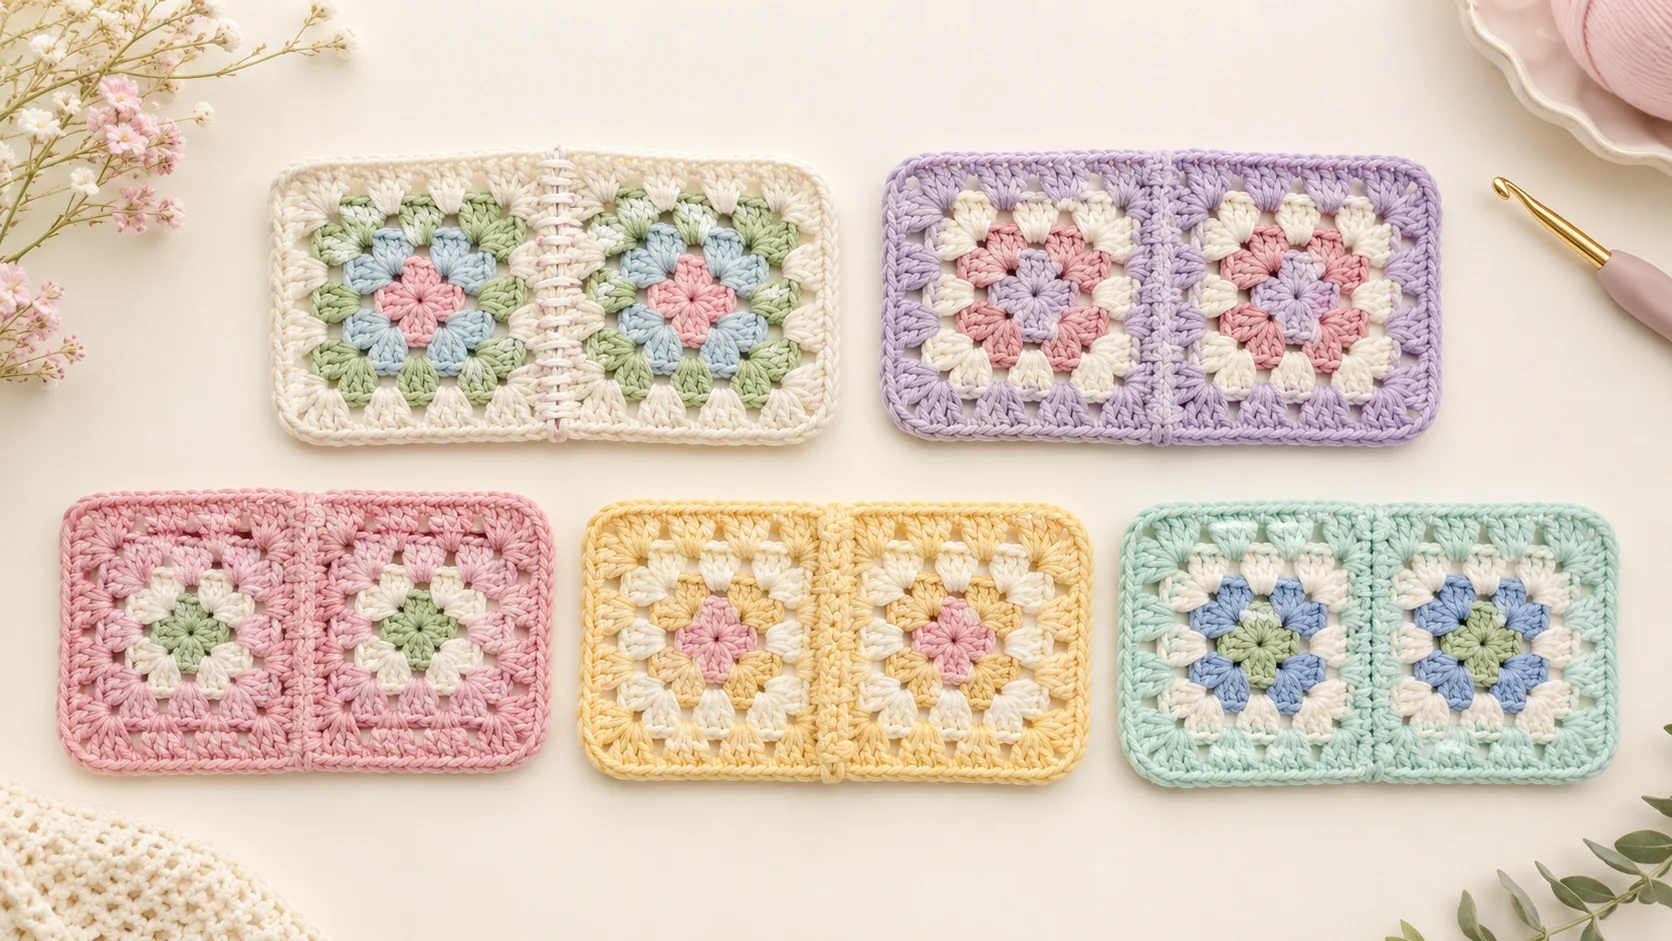
How to Join Granny Squares: 5 Easy Methods for Beginners
Finished crocheting a stack of granny squares but not sure how to join them neatly? The joining method you choose can completely change the look of your finished blanket, bag, cardigan, or cushion.
In this beginner-friendly guide, you’ll learn how to join granny squares using 5 easy methods, including both sewn and crochet joins. I’ll show you which techniques create a flat, almost invisible seam and which ones give your project a more decorative, textured finish.
By the end, you’ll know which joining method works best for your project and how to connect your granny squares with a clean, secure finish.
Below, you will learn five beginner-friendly methods step by step, plus how to choose the right one for blankets, bags, pillows, and other granny-square projects.
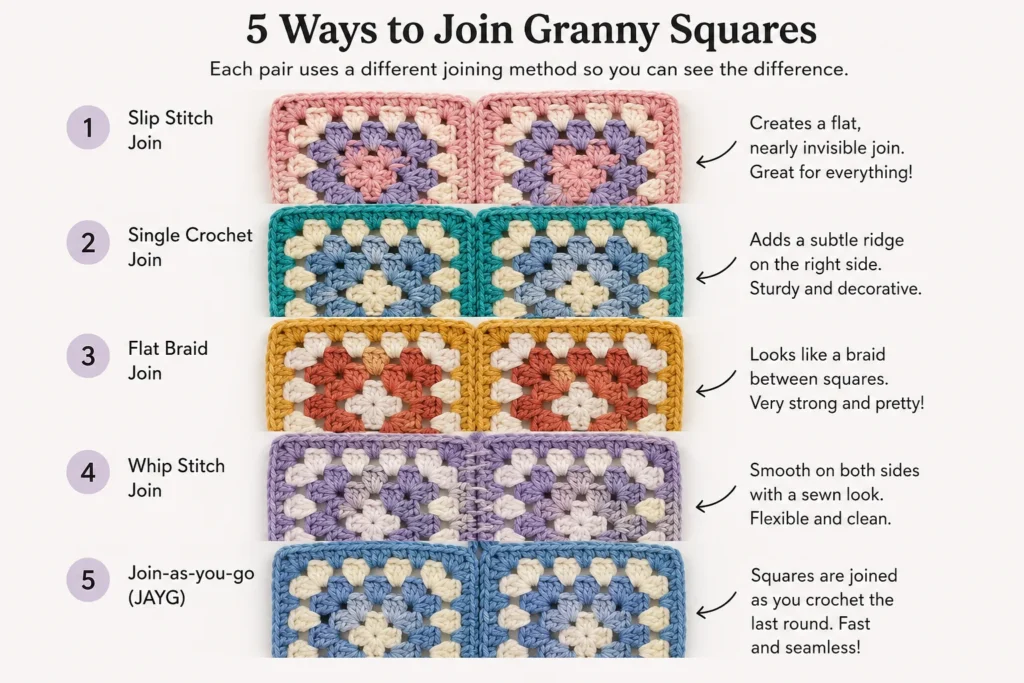
What Is the Easiest Way to Join Granny Squares?
For a first project, whip stitch and slip stitch are two of the simplest choices.
Choose whip stitch if you prefer sewing with a yarn needle. Choose slip stitch if you would rather keep using your crochet hook.
For a flatter, less noticeable finished seam, try mattress stitch. For a visible decorative ridge, use single crochet.
Here is the quick comparison before we get into the instructions.
| Joining method | Tool | Seam appearance | Best for | Beginner level |
|---|---|---|---|---|
| Whip stitch | Yarn needle | Simple sewn seam | Blankets, pillows, bags | Very easy |
| Mattress stitch | Yarn needle | Subtle, flatter seam | Projects where you want the squares to stand out | Easy |
| Slip stitch | Crochet hook | Flat to slightly raised | Blankets, garments, bags | Very easy |
| Single crochet | Crochet hook | Visible raised ridge | Decorative blankets and bags | Easy |
| Join-as-you-go | Crochet hook | Integrated join | Large motif projects | Easy to intermediate |
Crochet seams can be made either with a tapestry needle or directly with a crochet hook. Yarnspirations documents mattress stitch, whip stitch, slip stitch, and single crochet as separate approaches, each producing a different type of seam.
How to Join Granny Squares: Which Method Should You Choose?
Do not start joining immediately after making the final square.
A few minutes of preparation can prevent crooked seams and mismatched corners.
1. Check That the Squares Match
Place your granny squares next to each other on a flat surface.
Check:
- number of rounds
- overall size
- number of clusters along each side
- corner placement
- stitch count along matching edges
Two squares do not need to be mathematically identical down to a fraction of an inch, but their joining edges should line up without stretching one square aggressively to fit the other.
If one square has an extra round or missing cluster, fix that before joining.
2. Decide Which Side Is the Front
If your squares have a clear right and wrong side, arrange all of them in the same direction before joining.
This is particularly important for textured, floral, or multicolor motifs.
3. Arrange the Final Layout
If you are making a blanket or pillow, lay out all the squares first.
This allows you to check:
- color balance
- repeating colors
- motif direction
- overall dimensions
Take a quick photo of the layout before moving the squares. You can refer back to it while assembling the project.
4. Consider Blocking Before Joining
Blocking can help uneven motifs lie flatter and makes their edges easier to align. Yarnspirations specifically recommends blocking crochet pieces before seaming because it helps them reach the intended shape and makes accurate joining easier. For more examples of different joining techniques, see this crochet seaming guide from Yarnspirations.
Do not use aggressive blocking to force two genuinely different-sized squares to match. Fix major stitch or tension problems first.
What You Need
For the five methods below, have:
- finished granny squares
- matching or contrasting yarn
- crochet hook
- blunt tapestry needle
- scissors
- locking stitch markers or clips, optional
A blunt tapestry needle is preferable for sewn crochet seams because it passes through stitch loops rather than splitting the yarn fibers as easily as a sharp sewing needle.
For a seam you want to hide, use the same yarn and color as the final round when practical.
For a decorative seam, choose a contrasting color.
If your granny squares use very bulky yarn, a slightly thinner coordinating yarn can sometimes reduce seam bulk. Yarnspirations also suggests this option for bulky crochet pieces.
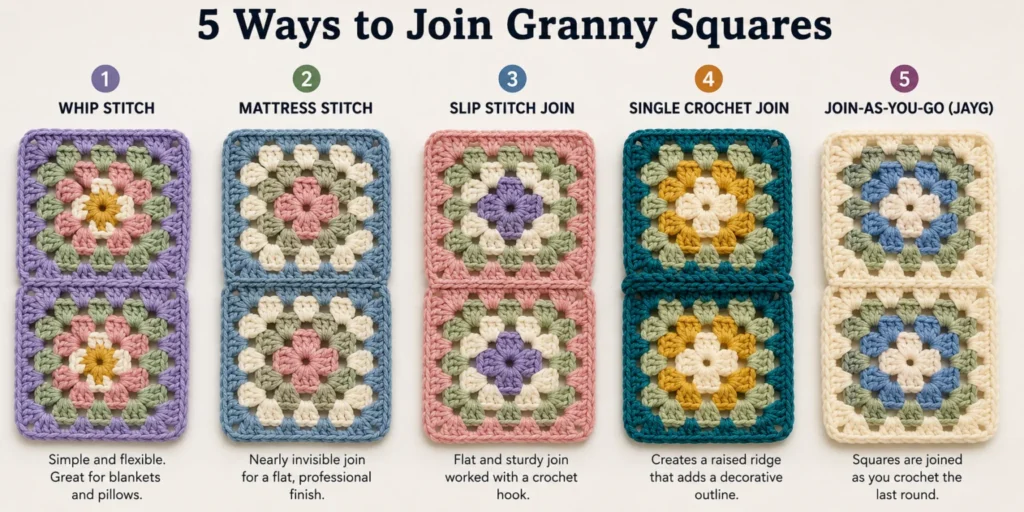
Method 1: Join Granny Squares With Whip Stitch
Best for: beginners, blankets, cushions, simple bags
Tool: tapestry needle
Result: flexible sewn seam
Difficulty: very easy
Whip stitch is one of the simplest ways to sew granny squares together. The needle travels through matching loops on both squares repeatedly in the same direction.
Yarnspirations describes whip stitch as similar to mattress stitch but with the needle continuing in the same direction rather than alternating directions.
Step 1: Place Two Squares Together
Place two squares with their right sides facing each other if you want most of the seam to sit toward the back of the finished project.
Align:
- first corner with first corner
- side stitches
- final corner with final corner
You can place a stitch marker through both corner spaces to keep them aligned.
Step 2: Thread Your Needle
Cut a length of matching yarn and thread it onto a tapestry needle.
A practical starting length for a sewn seam is about twice the seam length, which is also the guideline given in Yarnspirations’ crochet-seaming instructions.
Leave enough yarn at the beginning to weave in securely later.
Step 3: Start at the Corner
Insert the needle through matching loops at the first corner.
Pull the yarn through, but do not pull hard enough to bunch the crochet.
Step 4: Sew Through Matching Loops
Move to the next pair of stitches.
Pass the needle through the corresponding loop on both squares.
Continue across the edge, passing the needle through the matching loops in the same direction each time.
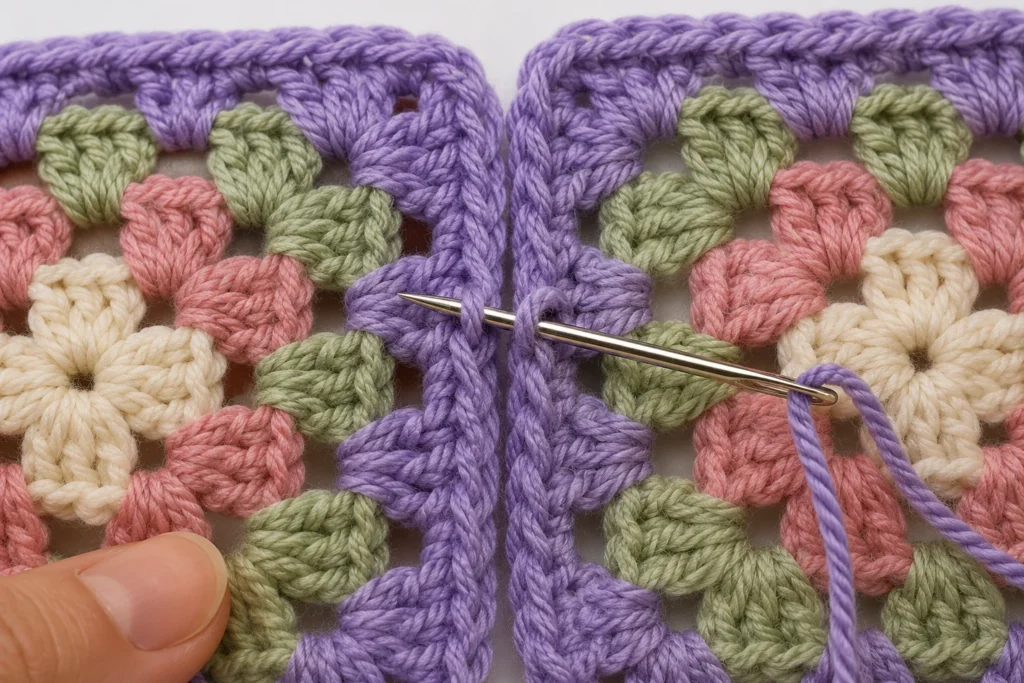
You may work through one or both loops, but whichever you choose, stay consistent across the seam.
Step 5: Check the Tension
After several stitches, open the squares gently.
The seam should hold them together without pulling the edges into a ridge or gathering the fabric.
If the seam puckers, loosen the yarn slightly.
Step 6: Finish the Seam
Continue to the opposite corner.
Secure the yarn and weave the tail into the back of the crochet.
Visual Check
When you open the two squares:
- the corners should line up
- neither square should be stretched
- the seam should run in a straight line
- the fabric should still lie reasonably flat
Common beginner mistake: Pulling every stitch as tight as possible.
A tighter seam is not automatically a neater seam. Over-tightening can make the joined edge shorter than the squares themselves and cause puckering.
Method 2: Join Granny Squares With Mattress Stitch
Best for: subtle seams and projects where the motifs should remain the focus
Tool: tapestry needle
Result: low-visibility sewn join
Difficulty: easy
Mattress stitch is useful when you do not want the joining yarn to become a strong visual part of the project. The seam is formed toward the underside rather than sitting prominently across the front.
Step 1: Match the Two Edges
Place the two squares together with their right sides facing each other.
Match the corner and edge stitches carefully.
Step 2: Secure the Yarn
Thread a tapestry needle and attach the yarn at the first corner.
Leave a tail for weaving in.
Step 3: Sew Through the First Matching Loops
Insert the needle through the next appropriate loop on one square and across to the corresponding loop on the other square.
Step 4: Reverse Direction
For the next stitch, pass the needle back through the next corresponding set of loops in the opposite direction.
This alternating movement is what distinguishes the mattress-style seam from a basic whip stitch.
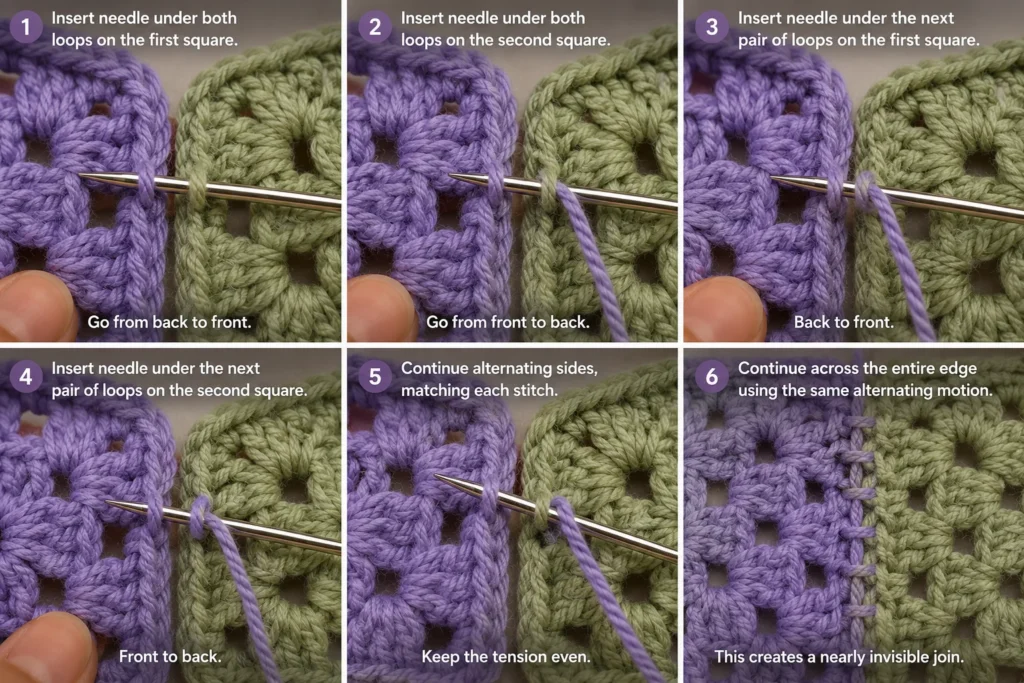
Step 5: Continue Along the Edge
Keep working from one square to the other, matching equivalent stitches as you move.
Avoid skipping a stitch on one square while using every stitch on the other. That will make the seam twist.
Step 6: Tighten Gradually
Every few stitches, gently pull the joining yarn until the squares come together.
Do not yank the entire seam closed.
The finished join should bring the two edges together without creating a gathered line.
Visual Check
Lay the squares flat with the right sides facing upward.
A successful mattress-style join should allow the motifs to sit close together while keeping the seam relatively discreet.
Common beginner mistake: Losing track of corresponding stitches.
If one square starts extending beyond the other, stop. Count how many edge stitches remain on each square before continuing.
Method 3: Join Granny Squares With Slip Stitch
Best for: beginners who prefer a crochet hook
Tool: crochet hook
Result: sturdy, relatively flat crocheted seam
Difficulty: very easy
If slip stitch and single crochet are still new to you, review our crochet guide for absolute beginners first.
Slip stitch joining is a convenient option because you do not need to switch to sewing.
Yarnspirations describes slip stitch seaming as a strong crochet join that is less bulky than some raised seams and can be worked on either the back or front depending on the desired appearance.
Step 1: Place the Squares Together
For a seam positioned mainly on the back, place the two squares with their right sides facing each other.
Align both corners and all corresponding edge stitches.
Step 2: Attach the Joining Yarn
Insert your crochet hook through the first matching loops of both squares.
Attach the yarn and pull up a loop.
Chain 1.
Step 3: Insert the Hook Through Both Squares
Move to the next matching stitch.
Insert the hook through the chosen loop of the first square, then continue through the corresponding loop of the second square.
The hook should pass through both pieces.
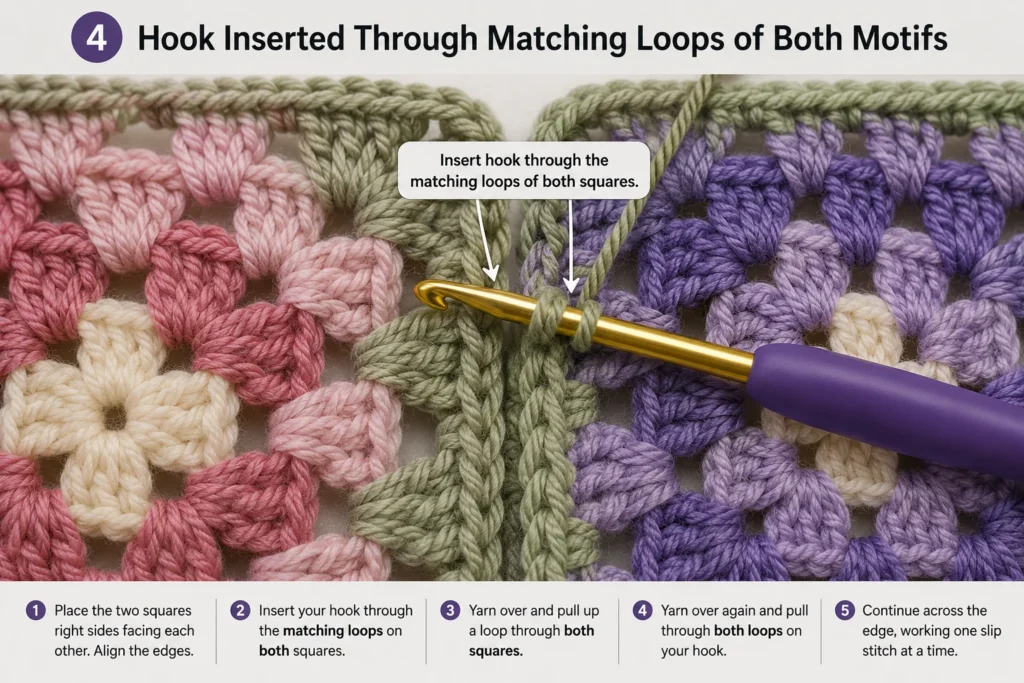
Step 4: Make a Slip Stitch
Yarn over.
Pull the yarn through both squares and through the loop already on your hook.
That completes one slip stitch.
Step 5: Repeat Across the Side
Continue:
- insert through matching loops
- yarn over
- pull through both squares
- pull through the working loop
Work all the way to the opposite corner.
Step 6: Check the Seam Before Fastening Off
Open the squares and lay them flat.
The seam should not pull the squares toward each other or make the joined edge noticeably shorter.
If the seam feels stiff or the squares curve upward, your slip stitches may be too tight.
Beginner Tip
Slip stitches are small, so it is easy to tighten them unintentionally.
Keep the working loop relaxed instead of pulling the hook tightly against the fabric after every stitch.
Method 4: Join Granny Squares With Single Crochet
Best for: decorative seams, bags, blankets, colorful projects
Tool: crochet hook
Result: visible raised ridge
Difficulty: easy
A single crochet seam is different from an invisible join because the seam itself can become part of the design.
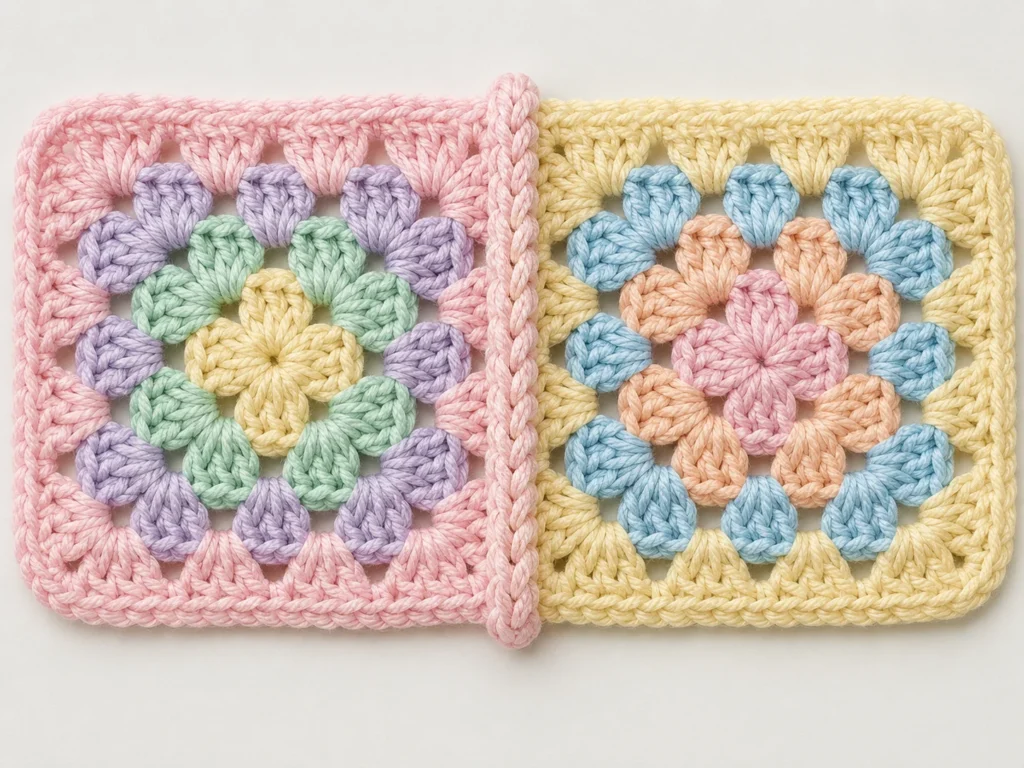
Yarnspirations notes that single crochet joining adds dimension and is often worked where the seam will remain visible as a decorative feature.
Step 1: Decide Where You Want the Ridge
If you want the raised seam on the front, place the squares with their wrong sides facing each other.
The right sides will face outward.
Step 2: Match the Corners
Align the squares carefully.
Attach the joining yarn at the first corner.
Chain 1.
Step 3: Insert the Hook Through Both Squares
Insert the hook through the matching loops on both granny squares.
Yarn over and pull up a loop through both pieces.
You should now have two loops on your hook.
Step 4: Complete the Single Crochet
Yarn over again.
Pull through both loops on your hook.
You have made one single crochet seam stitch.
Step 5: Continue Across
Work one single crochet through each matching pair of edge stitches.
Keep checking that the squares remain aligned.
Step 6: Fasten Off
At the opposite corner, fasten off and weave in both yarn tails.
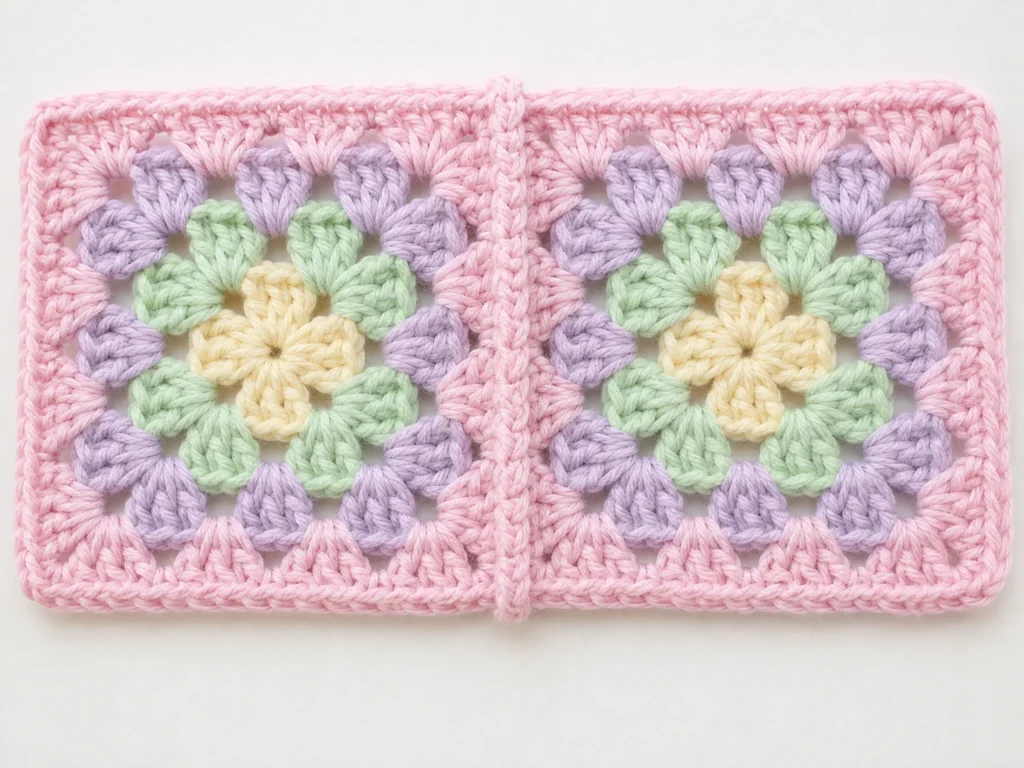
Visual Check
Turn the joined squares to the front.
You should see a consistent crocheted ridge running between the two motifs.
If you used a contrasting yarn, it should look intentional and evenly spaced.
Common beginner mistake: Expecting single crochet to disappear.
This is generally a more noticeable join. If you want the seam to fade into the motifs, use matching yarn or choose mattress or slip stitch instead.
Method 5: Join Granny Squares As You Go
Best for: blankets and projects made from many repeated motifs
Tool: crochet hook
Result: squares connected during their final round
Difficulty: easy to intermediate
You can also see a detailed join-as-you-go crochet tutorial from Yarnspirations for another visual example of this technique.
Join-as-you-go, often shortened to JAYG, is different from the first four methods because you do not completely finish every granny square and then seam them all afterward.
Instead, the next motif is attached to an already finished motif while its final round is being crocheted. Yarnspirations demonstrates this technique with classic granny squares and notes that exact joining placement can vary with the motif pattern.
Important Before Starting
Make the first granny square completely.
For every additional square, crochet normally until you reach the final round that will touch an existing square.
The exact instructions below suit a classic granny-style construction. If your granny-square pattern gives its own join-as-you-go instructions, follow that pattern instead.
Step 1: Crochet the Second Square to Its Final Round
Complete all rounds except the joining portion of the last round.
Work normally until you reach the first corner that needs to connect to the finished square.
Step 2: Crochet the First Half of the Corner
For a classic granny corner, work the first cluster, usually:
3 double crochets
Stop before completing the normal corner chain space.
Step 3: Connect the Corner
Instead of making the entire normal corner chain, use a slip stitch to connect to the corresponding corner of the finished square.
Yarnspirations’ classic JAYG example similarly replaces the usual connecting corner space with a slip-stitch connection.
Step 4: Finish the Corner
Return to the square you are currently making.
Work the remaining cluster needed to complete the corner.
Step 5: Join Along the Side
For larger granny squares, connect the motifs at intervals along the shared edge rather than connecting only the two corners.
Depending on the pattern, these connections may be worked into corresponding chain spaces or stitch locations along the completed square. Yarnspirations notes both approaches as possible variations.
Step 6: Connect the Second Corner
When you reach the other end of the shared side, connect that corner to the matching corner of the completed motif.
Then finish the rest of the new granny square normally.
Visual Check
The two motifs should now be attached along one edge without a separate seam being added afterward.
Check that:
- both corners are connected
- the squares are facing the same direction
- the shared edge is not stretched
- the join is distributed evenly along the side
Beginner Warning
Join-as-you-go is efficient, but it requires more planning.
Before joining, decide exactly where every square belongs in the final layout. Changing the arrangement later is much harder than with loose squares.
Which Granny Square Joining Method Should You Choose?
There is no single best method for every project.
Use the finish you want as your deciding factor.
Choose Whip Stitch If…
You want:
- a simple method
- a yarn needle instead of a hook
- a flexible seam
- an easy first joining technique
Choose Mattress Stitch If…
You want:
- a subtle seam
- the motifs to remain the visual focus
- a sewn rather than crocheted join
Choose Slip Stitch If…
You want:
- to use a crochet hook
- a relatively flat join
- a simple repeat
- less decorative texture than single crochet
Choose Single Crochet If…
You want:
- the seam to be visible
- an extra design line between squares
- a contrasting joining color
- a slightly more dimensional finish
Choose Join-As-You-Go If…
You want:
- to avoid doing all your seaming at the end
- to connect a large number of motifs during construction
- an integrated motif layout
For a first granny-square blanket, whip stitch or slip stitch is a straightforward place to begin.
Invisible Join vs. Decorative Join
The easiest way to choose is to ask one question:
Do you want people to notice the seam?
If the answer is no, try:
- mattress stitch
- matching-color whip stitch
- slip stitch worked toward the back
If the seam should become part of the design, try:
- contrasting single crochet
- front-facing slip stitch
- decorative join-as-you-go
This decision matters even more when your squares contain several colors.
A cream joining yarn between colorful squares can create a grid around every motif. A matching join can make the squares appear more continuous.
How to Join a Lot of Granny Squares for a Blanket
Do not pick up random pairs of squares and join them without a plan.
For a large blanket:
- Lay out every square.
- Photograph the layout.
- Divide the squares into rows.
- Secure neighboring corners with stitch markers if needed.
- Join the squares across each row.
- Join the completed rows together.
- Check alignment whenever four corners meet.
- Weave in ends as you work rather than leaving dozens until the very end.
The exact order can vary, but using a consistent assembly system helps prevent squares from being accidentally rotated or placed in the wrong color sequence.
Check the Intersections
The places where four squares meet deserve extra attention.
The four corners should come together without:
- a large hole
- a thick knot
- one corner overlapping another
- one row sitting higher than its neighbor
Before fastening off a long seam, lay the project flat and inspect those intersections.
Why Are My Joined Granny Squares Puckering?
Puckering usually means something along the seam is shorter or tighter than the crochet fabric around it.
Check these possibilities.
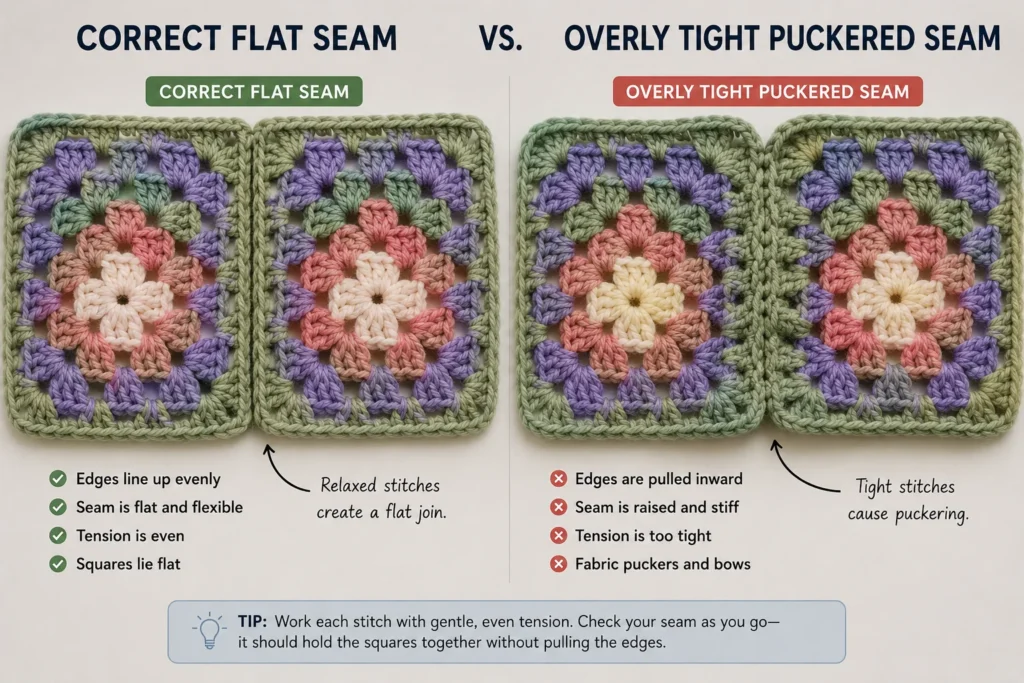
The Joining Yarn Is Too Tight
This is especially common with slip stitch and sewn seams.
Your seam should secure the fabric, not cinch it.
The Squares Are Different Sizes
If one edge needs to be stretched significantly to match the other, the seam may distort both motifs.
Compare the squares before joining.
You Skipped Matching Stitches
If you joined ten stitch positions on one square to nine on another, the edges will not distribute evenly.
Use corner markers and match the stitches as you go.
Your Slip Stitches Are Too Small
Keep the working loop relaxed.
If the seam curls as soon as you open the squares, undo a few stitches and try again with less tension.
Why Is There a Gap Between My Granny Squares?
Small openings can appear when:
- corners are not securely connected
- stitches near a corner were skipped
- the join is too loose
- motifs with different edge structures are being connected
Check the corner first.
If the squares meet properly at both corners but the middle gaps, inspect the spacing of your joining stitches along the side.
Do not keep tightening the entire seam to fix one isolated gap. That can create puckering elsewhere.
Should You Block Granny Squares Before or After Joining?
For projects where individual square size and alignment matter, blocking before joining can make assembly easier. Yarnspirations recommends blocking crochet motifs before seaming so the pieces are flat and properly shaped.
Depending on the project and fiber, you may also give the completed piece a final finishing block afterward.
Always follow care instructions for the yarn you are using because different fibers respond differently to washing, moisture, heat, and shaping.
A Simple Practice Test Before Joining a Whole Blanket
Do not learn a new seam on a 60-square blanket.
Make four small practice granny squares using scrap yarn.
Join:
- two with whip stitch
- two with slip stitch
Compare the results.
Look at:
- seam visibility
- flexibility
- thickness
- how flat the squares lie
- which technique feels easier for you
If you want to test all five methods, make enough small sample squares to create one seam with each.
Keep the sample afterward as a reference.
FAQ
What is the best stitch for joining granny squares?
There is no single best stitch. Slip stitch is simple and relatively flat, single crochet creates a more visible ridge, while mattress and whip stitch use a yarn needle instead of a crochet hook. Choose according to the finish you want.
Is it better to sew or crochet granny squares together?
Both work.
Sewn joins such as mattress and whip stitch are useful when you want less crochet texture between motifs. Crocheted joins such as slip stitch and single crochet are convenient if you prefer working with a hook.
Can I join granny squares with the same crochet hook?
Yes. Slip stitch, single crochet, and many join-as-you-go methods can be worked with a crochet hook. You usually do not need a special joining hook.
Should I use the same color yarn to join granny squares?
Use the same or a similar color when you want the seam to blend in.
Use a contrasting color when you deliberately want the join to outline each motif.
Can I join granny squares before weaving in the ends?
You can, but weaving in the motif ends before or during assembly usually keeps the finishing work more manageable. Avoid trapping loose ends where they become difficult to secure later.
Do granny squares need to be exactly the same size before joining?
They should be close enough in size that the matching edges align without substantial stretching or gathering.
Minor differences may be improved through appropriate blocking, but a large mismatch often indicates different stitch counts, rounds, hook sizes, or tension.
What to Do Next
If this is your first time joining granny squares, make a small two-square sample before assembling your real project.
Start with whip stitch if you prefer sewing or slip stitch if you prefer using your crochet hook.
After you understand how matching edges line up, experiment with mattress stitch for a subtler seam or single crochet for a visible decorative join. Join-as-you-go is worth learning when you begin making larger motif projects.
If you still need practice making consistent squares, return to Granny Squares for Beginners: Easy Step-by-Step Guide before joining them.
A neat granny-square project does not depend on hiding every seam. The goal is to choose a joining method intentionally and keep the tension, stitch placement, and alignment consistent from the first square to the last.
One Comment