Easy No-Sew Amigurumi for Beginners: Make a Mini Octopus
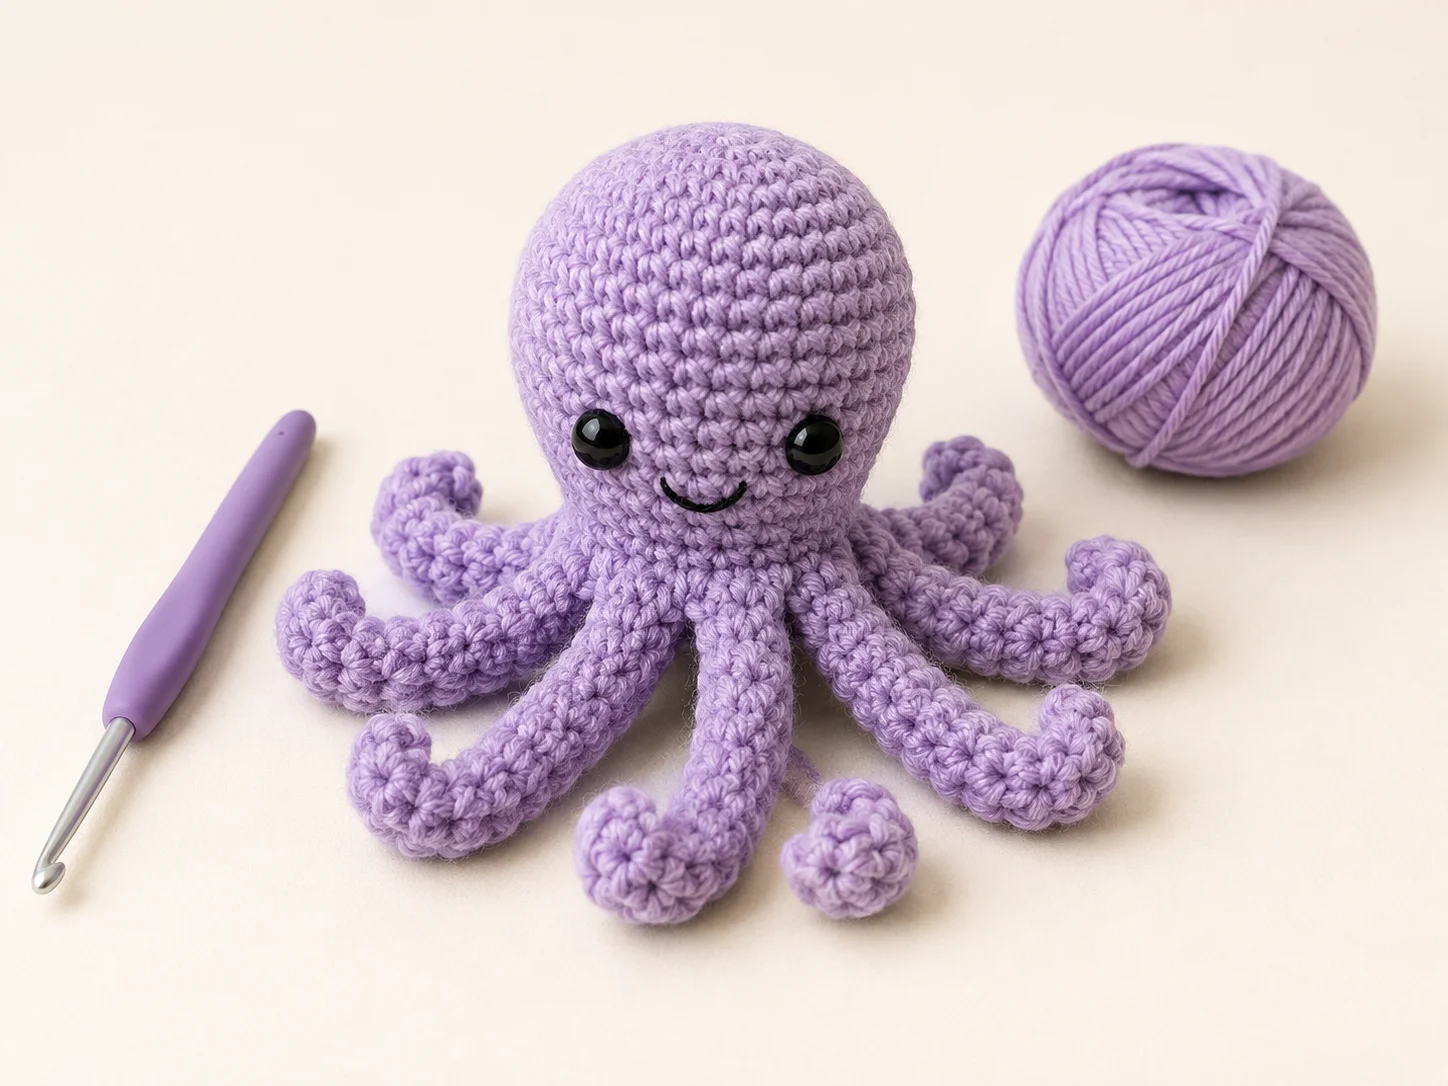
Easy no-sew amigurumi for beginners is a simple way to start making crochet toys without attaching tiny arms, legs, ears, or other pieces afterward.
This beginner project makes a small no-sew crochet octopus using single crochet, increases, decreases, and chains. The body is worked in continuous rounds, and all eight tentacles are crocheted directly from the bottom.
You will still need to fasten off and hide the final yarn tail, but there are no separate crochet pieces to sew together.
What Is No-Sew Amigurumi?
No-sew amigurumi is a crochet toy construction method where features such as legs, ears, wings, or tentacles are crocheted directly into the main piece instead of being made separately and sewn on later.
“No-sew” does not always mean a yarn needle is never used. You may still need one to weave in an end, embroider a face, or cinch a small opening closed.
The main advantage is that you avoid traditional amigurumi assembly.
That makes no-sew projects especially useful for beginners who are comfortable making stitches but are not yet confident attaching body parts evenly.
If this is your first stuffed crochet project, start with How to Make Amigurumi for Beginners for the basic construction techniques.
Why Easy No-Sew Amigurumi for Beginners Works So Well
Traditional amigurumi often requires several pieces to be positioned and attached after crocheting.
That can be difficult because:
- one ear may sit higher than the other
- arms can twist in different directions
- legs may not line up evenly
- sewing can distort the shape
A no-sew design lets you focus on the crochet itself.
You will practice:
- counting stitches
- working in continuous rounds
- increasing
- decreasing
- using a stitch marker
- stuffing evenly
- controlling tension
Beginner Project at a Glance
This easy no-sew amigurumi for beginners project keeps the construction simple while still teaching the basic shaping skills used in crochet toys.
| Detail | Recommendation |
|---|---|
| Skill level | Beginner |
| Construction | One main piece |
| Terms | U.S. crochet terminology |
| Main stitch | Single crochet |
| Yarn | #4 medium/worsted yarn |
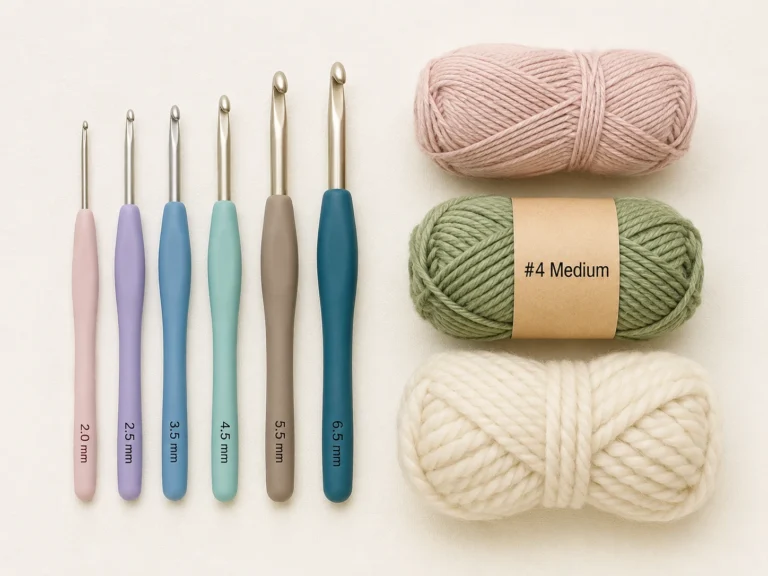
| Hook | 3.5 mm |
| Other supplies | Stuffing, stitch marker, yarn needle |
| Approximate time | Varies by experience and crochet speed |
| Finished size | About 3–4 inches, depending on yarn and tension |
| Separate pieces to sew | None |
The finished size may vary depending on yarn thickness, hook size, stuffing, and personal tension.
Lia’s Note: I tested this octopus with smooth #4 medium yarn and a 3.5 mm hook. The smaller hook helped keep the fabric firm enough to hold the stuffing without large gaps.
Supplies You Will Need
Gather:
- #4 medium-weight yarn
- 3.5 mm crochet hook
- polyester fiberfill
- locking stitch marker
- yarn needle
- scissors
- small amount of dark yarn for the face
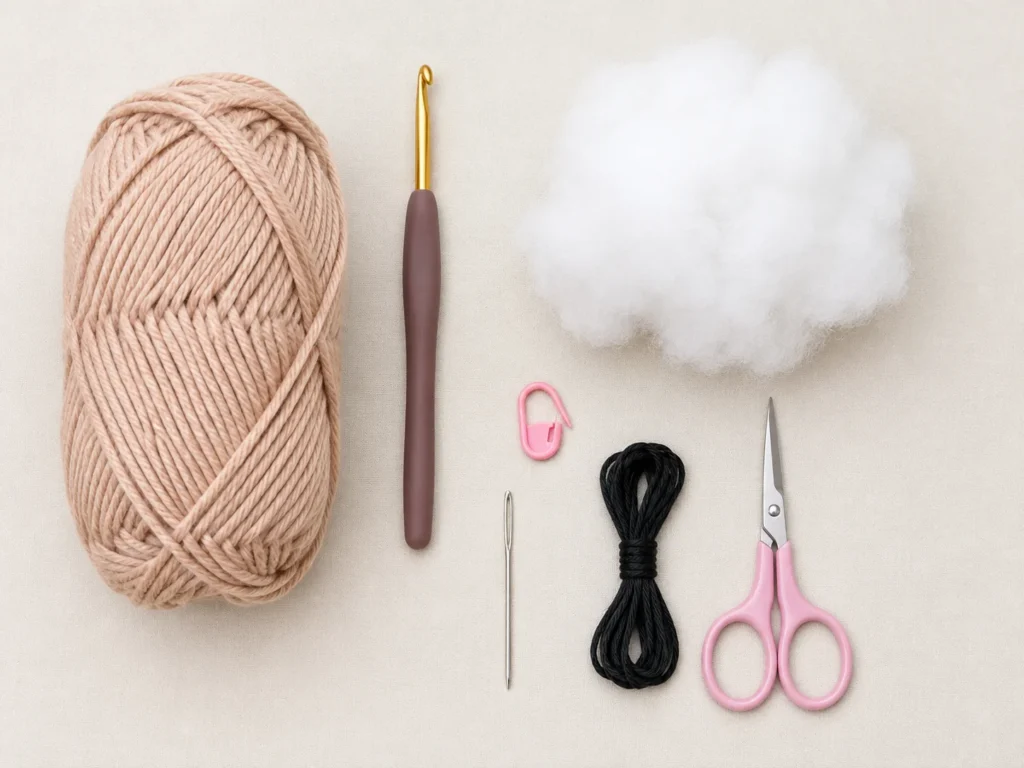
For a first amigurumi project, smooth light-colored yarn is easier to work with than very dark or fuzzy yarn because the stitches are easier to see.
If your stitches feel extremely tight with a 3.5 mm hook, try moving up to a 4 mm hook.
Can I Use Plush or Chenille Yarn?
Yes, but it is usually easier to learn the pattern with smooth yarn first.
Plush yarn hides stitch openings, making it harder to count stitches or see exactly where the hook should go.
Once you are comfortable with the construction, you can make the same project with plush yarn for a softer, larger result.
Crochet Abbreviations Used
This pattern uses U.S. crochet terminology.
- MR = magic ring
- sc = single crochet
- inc = increase
- dec = decrease
- ch = chain
- sl st = slip stitch
- st/sts = stitch/stitches
- rnd = round
- FLO = front loop only
If these abbreviations are still new to you, read How to Read Crochet Patterns before starting the project.
Before You Begin
The octopus is made in two main stages.
First, you crochet the rounded body from the top downward.
Then you use the eight remaining stitches around the bottom to crochet eight tentacles directly onto the body.
You do not make eight separate tentacles.
The body is worked in continuous rounds. Do not join each round unless the pattern tells you to.
Place a stitch marker in the first stitch of each round and move it upward as you work.
Count Your Stitches
Count at the end of every increase and decrease round.
A mistake in an early round may not be obvious immediately, but it can make the body look uneven later.
Fixing one incorrect stitch early is easier than unraveling several rounds.
Easy No-Sew Mini Octopus Pattern
Quick Pattern
Rnd 1: 6 sc in MR. (6)
Rnd 2: inc around. (12)
Rnd 3: (sc, inc) × 6. (18)
Rnd 4: (2 sc, inc) × 6. (24)
Rnd 5–8: sc around. (24)
Rnd 9: (sc, dec) × 8. (16)
Stuff the body.
Rnd 10: dec × 8. (8)
Tentacles: Work one curled tentacle into the FLO of each remaining stitch.
Finish: Cinch the opening closed through the unused back loops.
Step 1: Make a Magic Ring
Create a magic ring.
Work 6 single crochet stitches into the center of the ring.
Pull the yarn tail to close the center.
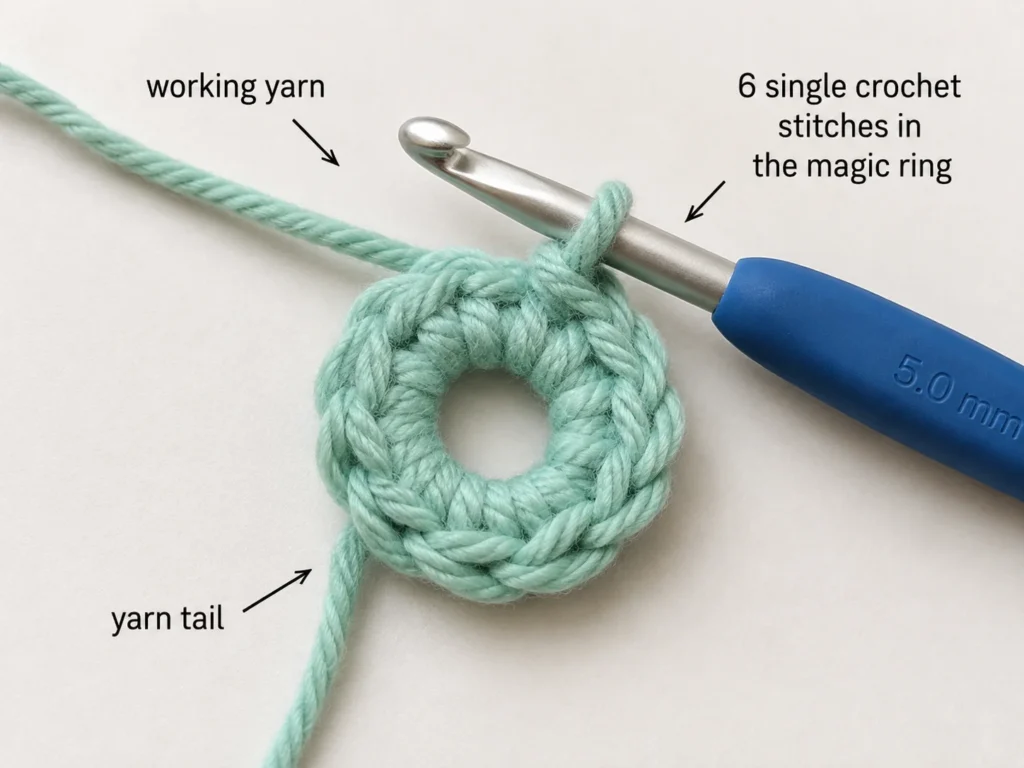
Round 1: 6 sc in MR. (6)
You should now have a tiny circle with six stitches around the edge.
If this technique is new to you, follow How to Make a Magic Ring in Crochet first.
Keep the working yarn and yarn tail separate.
Magic Ring Alternative
If you do not want to use a magic ring:
- Chain 2.
- Work 6 single crochets into the second chain from your hook.
The center may remain slightly more visible, but you can continue the pattern normally.
Step 2: Increase to 12 Stitches
Work two single crochets into each stitch around.
Round 2: inc in each st around. (12)
An increase means placing two stitches into one stitch.
You should finish with exactly 12 stitches.
Visual checkpoint: The piece should still look mostly flat.
Beginner mistake: Missing one increase and ending with only 11 stitches.
Count before moving on.
Step 3: Increase to 18 Stitches
Repeat:
1 single crochet in the next stitch, then 2 single crochets in the following stitch.
Round 3: (sc, inc) × 6. (18)
You should now have 18 stitches.
The circle should be larger but still relatively flat.
Step 4: Increase to 24 Stitches
Repeat:
1 single crochet in each of the next 2 stitches, then increase in the next stitch.
Round 4: (2 sc, inc) × 6. (24)
You should finish with 24 stitches.
This is the widest part of the body.
If your circle becomes very wavy, recount the stitches because you may have added an extra increase.
If it starts curling strongly into a cup too early, check that you did not miss an increase.
A slight curve is fine.
Step 5: Crochet the Sides
Work one single crochet into every stitch around.
Rounds 5–8: sc around. (24)
Repeat this for four rounds.
Do not increase.
The flat circle will gradually curve downward and start looking like a small bowl.
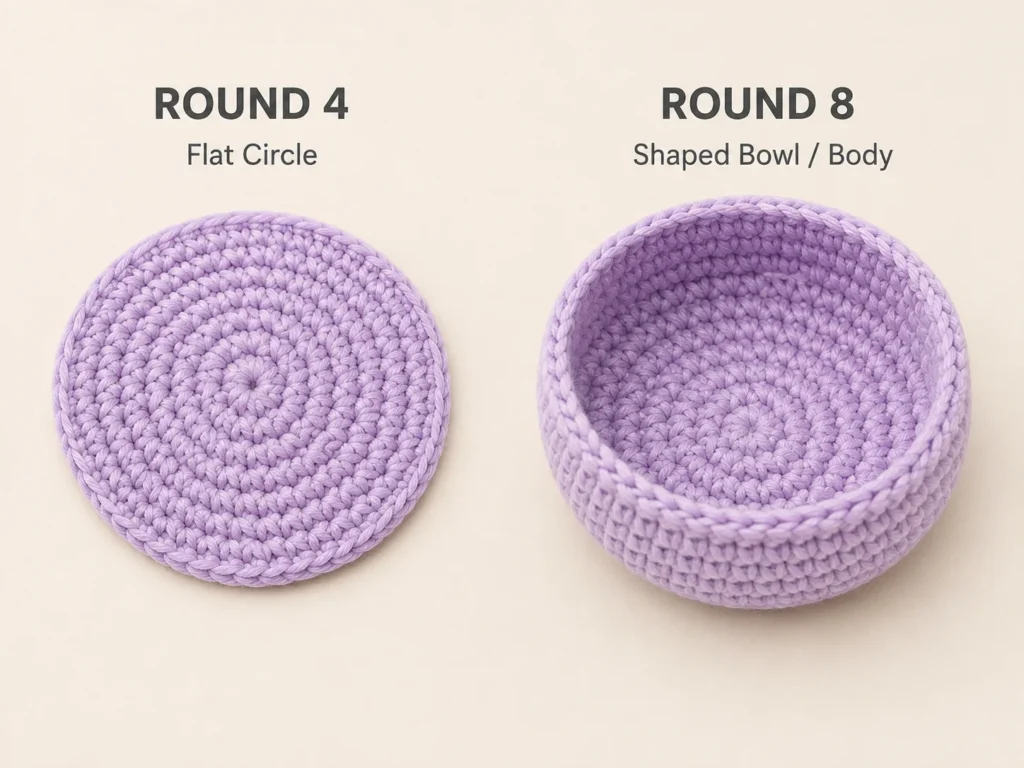
Visual checkpoint: By the end of Round 8, the project should have a rounded top and defined sides.
Step 6: Add the Face
For a beginner-friendly version, embroider the eyes using dark yarn.
Position the eyes around Rounds 6–7.
Leave several stitches between the eyes so the face does not look crowded.
You can make each eye using two or three small vertical stitches.
Do not pull the embroidery yarn too tightly or the body may pucker.
What About Plastic Safety Eyes?
For projects intended for babies or children under 3, use embroidered eyes instead of detachable plastic safety eyes because small parts can present a choking hazard.
For more information, see the U.S. Consumer Product Safety Commission’s guidance on small parts and choking hazards.
If you are making the octopus as a decorative item or for an older child, follow the manufacturer’s instructions for any craft eyes you use.
Step 7: Begin Decreasing
Now make the lower body narrower.
Repeat:
1 single crochet in the next stitch, then decrease over the next two stitches.
Round 9: (sc, dec) × 8. (16)
You should have 16 stitches remaining.
A decrease turns two stitches into one.
Avoid pulling each decrease unusually tight because this can make the bottom look puckered.
Step 8: Stuff the Body
Add polyester stuffing in small pieces.
Push the stuffing toward the top and sides before adding more.
The goal is a rounded body that holds its shape without stretching the crochet fabric.
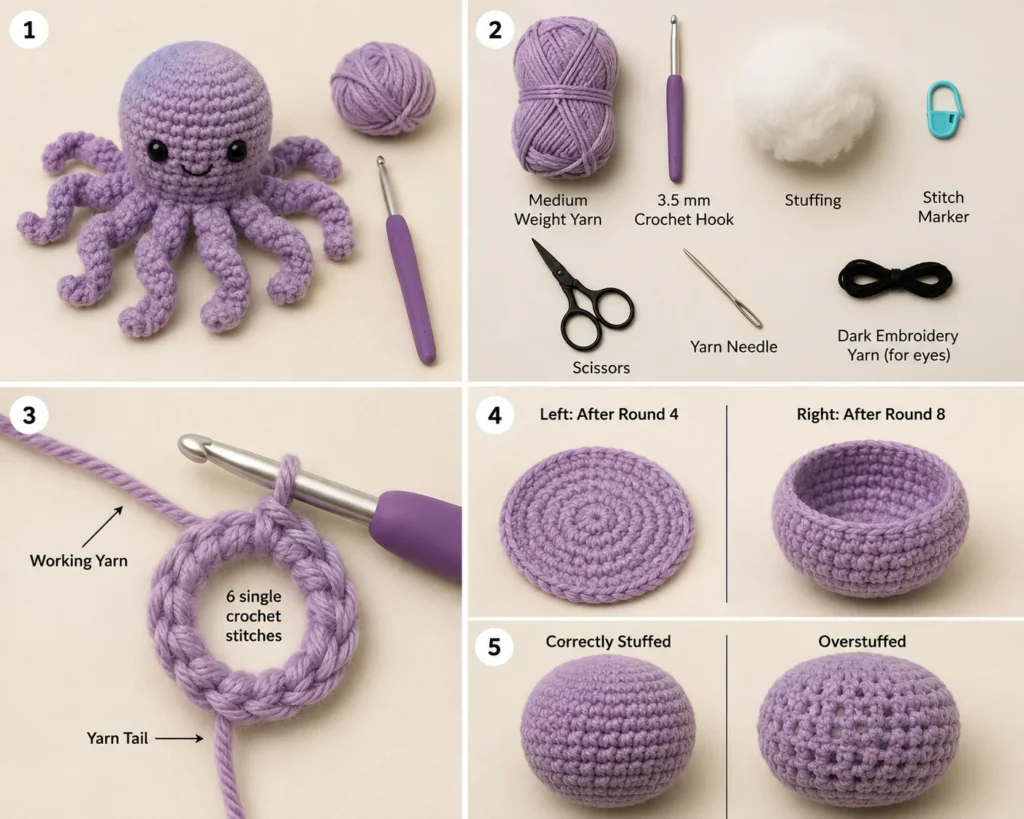
How Much Stuffing Should You Add?
Stop when:
- the body holds its shape
- the top does not collapse
- stuffing is not showing through the stitches
- the crochet fabric is not stretched
Avoid pushing one large clump of stuffing into the body.
Small amounts are easier to distribute evenly.
Do most of your stuffing now because the opening will become much smaller in the next round.
Step 9: Decrease to Eight Stitches
Work one decrease over each pair of stitches.
Round 10: dec × 8. (8)
You should now have 8 stitches.
Add a small amount of extra stuffing if needed.
Do not close the opening yet because these eight stitches will be used for the tentacles.
Step 10: Crochet Eight Tentacles
Work the tentacles into the front loop only of the eight remaining stitches.
For each tentacle:
- Slip stitch into the front loop of the next body stitch.
- Chain 8.
- Starting in the second chain from your hook, work 2 single crochets into each chain.
- Continue back toward the body.
- Slip stitch into the same front loop where the tentacle started.
- Move to the next body stitch.
- Repeat until you have eight tentacles.
Placing two single crochets into each chain causes the tentacle to curl naturally.
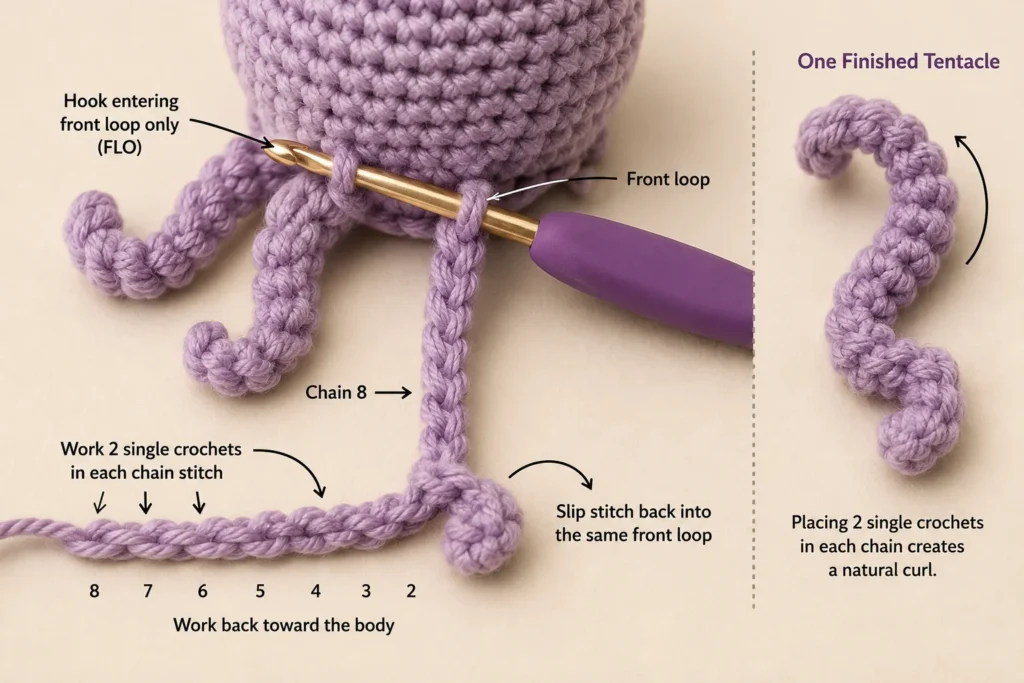
Visual checkpoint: You should have eight curled tentacles arranged around the bottom opening.
If the Tentacles Are Not Curling
Check that you worked two single crochets into every chain.
If you worked only one single crochet per chain, the tentacle will remain much straighter.
You can also gently wrap the finished tentacle around your finger to shape it.
For Shorter Tentacles
Chain 6 instead of 8.
For Longer Tentacles
Chain 10 instead of 8.
Continue working two single crochets into each chain.
Step 11: Close the Bottom
After finishing the eighth tentacle, cut the yarn and leave a tail about 8 inches long.
Fasten off.
Thread the yarn tail onto a yarn needle.
Because the tentacles were worked through the front loops, the back loops of the eight body stitches should still be available.
Pass the yarn needle through each unused back loop around the opening.
Pull the yarn gently.
The opening should cinch closed like a drawstring.
Secure the yarn and hide the tail inside the body.
You have now finished the octopus without sewing separate crocheted pieces together.
What the Finished Octopus Should Look Like
Your completed project should have:
- a smooth rounded head
- firm but flexible stuffing
- eight curled tentacles
- a centered face
- a closed bottom
- no visible stuffing
- no separate crochet pieces sewn onto the body
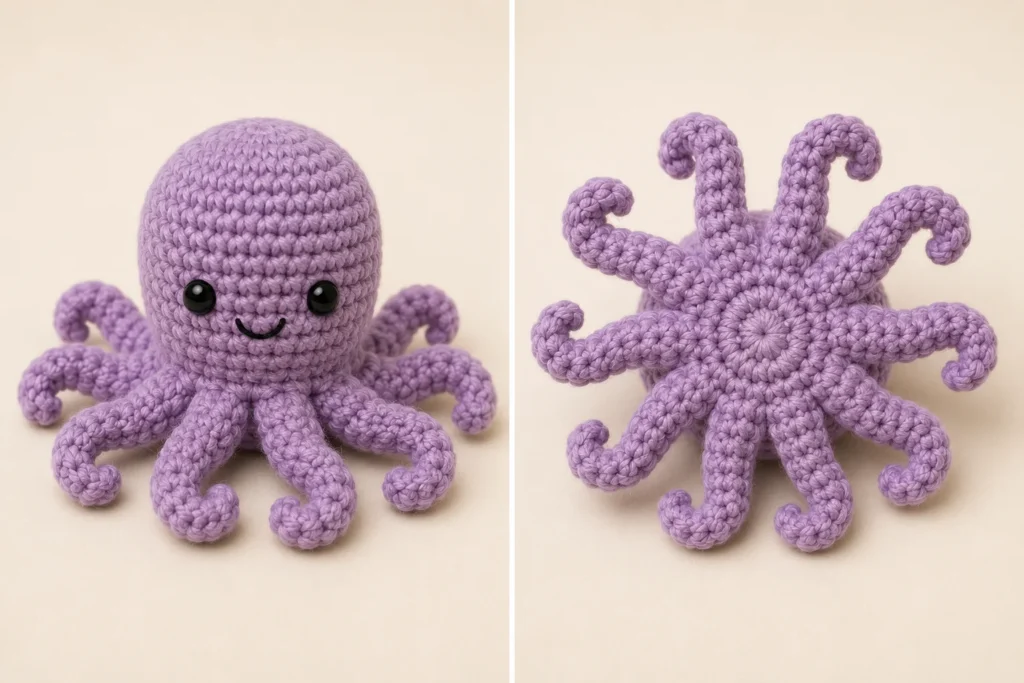
Do not worry if your first octopus is slightly taller, wider, or less symmetrical than a sample photo.
Instead, check the basics:
Is your final stitch count correct?
Is the stuffing contained inside the fabric?
Is the bottom securely closed?
If yes, the project is complete.
Common No-Sew Amigurumi Problems
Even with an easy no-sew amigurumi for beginners pattern, small problems with stitch count, stuffing, or tension can affect the finished shape.
Stuffing Is Showing Through My Stitches
Possible causes include:
- hook is too large
- tension is too loose
- body is overstuffed
First remove some stuffing.
If large gaps remain throughout the project, try using a slightly smaller hook next time.
My Octopus Looks Lopsided
Count your stitches.
A missed increase or an accidental extra stitch can change the shape.
If the stitch count is correct, move the stuffing around with your fingers until both sides look even.
The Opening Became Too Small to Stuff
Add most of the stuffing before Round 10.
Once only eight stitches remain, it becomes difficult to push large amounts of fiberfill into the body.
Use the small opening only for final adjustments.
My Tentacles Are Different Lengths
Count the starting chains.
Each tentacle in the main pattern begins with 8 chains.
It is easy to accidentally chain 7 or 9 when repeating the same step several times.
My Tentacles Look Messy
Individual tentacles may curl in slightly different directions.
That is normal.
The important check is that you consistently worked two single crochets into each chain.
The Bottom Will Not Close
Make sure your closing yarn passes through all eight unused back loops.
If the body is heavily stuffed directly behind the opening, remove a small amount of filling.
Pull the closing yarn gradually rather than sharply.
Smooth Yarn vs. Plush Yarn
| Smooth Medium Yarn | Plush or Chenille Yarn |
|---|---|
| Stitches are easier to see | Stitches can disappear in the fibers |
| Easier to count | Easier to lose your place |
| Magic ring is easier to see | Magic ring can be harder to tighten |
| Makes a smaller toy | Usually makes a larger plushie |
| Better for learning | Good once you understand the pattern |
You can still use plush yarn as a beginner.
The real question is whether you can clearly identify every stitch.
If you repeatedly lose your place, switch to smooth yarn for your first version.
No-Sew vs. Low-Sew Amigurumi
These terms are sometimes used differently by pattern designers.
| Pattern Type | What It Usually Means |
|---|---|
| No-sew | No separate crocheted pieces are sewn onto the body |
| Low-sew | One or a few parts still need to be attached |
| Traditional amigurumi | Several body parts may be made separately and sewn together |
Always read the construction notes before starting a pattern.
If you see separate instructions for arms, legs, ears, and tails, check whether those pieces will eventually need to be sewn onto the body.
After finishing this easy no-sew amigurumi for beginners project, you will already understand the basic shaping, stuffing, and counting skills used in many crochet animals.
Easy No-Sew Projects to Try Next
No-Sew Whale
A rounded whale is a good next project for practicing shaping.
Look for a design where the fins and tail are formed directly into the body.
No-Sew Jellyfish
A jellyfish gives you more practice with chains and curled tentacles.
It is also easy to customize the tentacle lengths.
No-Sew Frog
A simple frog can help you practice longer limbs without traditional assembly.
No-Sew Bee
A bee is useful for learning color changes while keeping the body shape simple.
Choose a pattern where the wings are crocheted directly into the project if you want to avoid sewing.
No-Sew Turtle
A turtle adds more detailed shaping while still being manageable for a beginner.
Check the instructions carefully because some turtle patterns are actually low-sew rather than completely no-sew.
Frequently Asked Questions
Is no-sew amigurumi easier than regular amigurumi?
It can be easier for beginners because you avoid positioning and sewing several separate pieces. You still need to count stitches, increase, decrease, stuff, and finish the project carefully.
Can a complete beginner make no-sew amigurumi?
Yes, although it helps to know how to chain, make a single crochet, and identify stitches first.
If chaining and single crochet are still difficult, practice them first in How to Crochet for Absolute Beginners.
Do I Need a Magic Ring?
No.
You can use the chain-2 method instead.
The magic ring simply creates an adjustable center that can be pulled tightly closed.
Why Use a Smaller Hook for Amigurumi?
A relatively tight crochet fabric helps keep the stuffing inside.
Your stitches should be firm, but the hook should still move through them comfortably.
Does No-Sew Mean I Do Not Need a Yarn Needle?
Not always.
You may still use a yarn needle to hide a tail, embroider a face, or close an opening.
The “no-sew” part mainly refers to avoiding the assembly of separate crocheted body parts.
What Yarn Is Easiest for Beginner Amigurumi?
Smooth medium-weight yarn in a light or medium color is a practical choice because the individual stitches are easier to see and count.
What to Make Next
After you complete one or two no-sew projects, try a traditional amigurumi animal with a few attached pieces.
When you are ready to try a project with more shaping and attached pieces, move on to your first crochet animal.
The skills you learned here will carry over directly:
- working in continuous rounds
- increasing
- decreasing
- counting stitches
- stuffing
- shaping a three-dimensional crochet piece
From there, you can move on to more detailed crochet animals without feeling like you are learning everything at once.
One Comment